
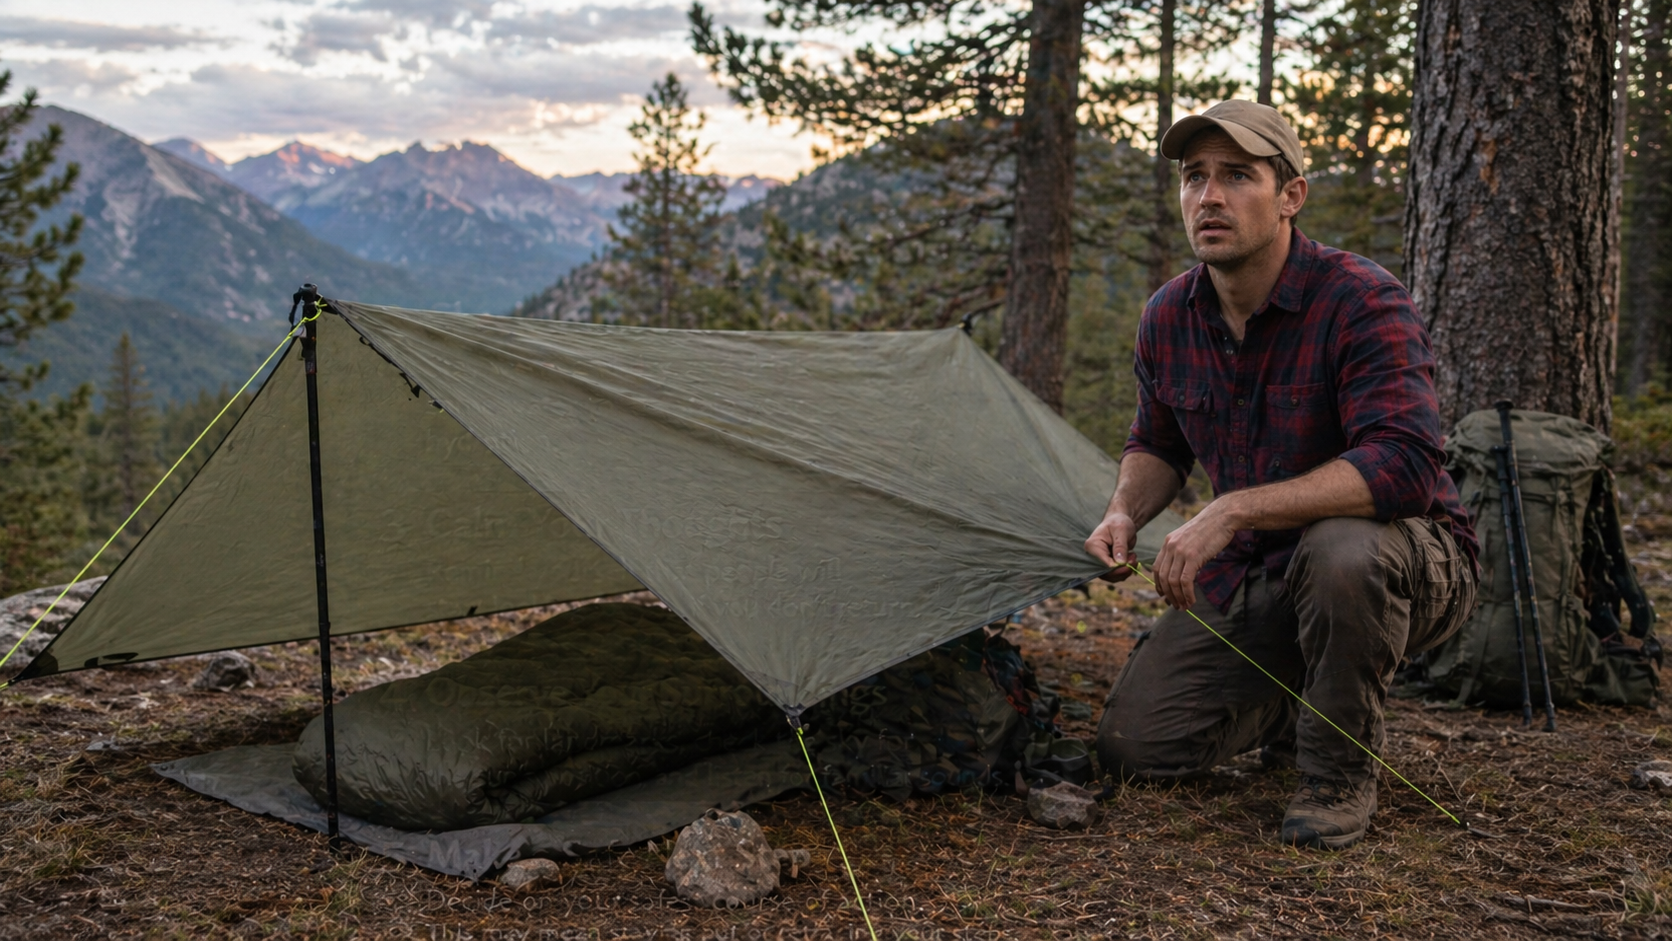
A flat tarp can look almost too simple at first.
It is just a waterproof sheet with tie-out points around the edges. There are no tent poles sewn into it. There is no built-in floor. There are no zippered doors or mesh walls.
But that simple sheet can become a useful hiking shelter when you understand how the system works.
A flat tarp shelter is not just the tarp. It also includes the supports that hold it up, the guylines that create tension, the stakes that anchor it, and the ground protection that keeps you separated from damp soil.
That is why it helps to think of a flat tarp as a shelter system, not just a piece of fabric.
For a broader look at how a tarp fits into a full lightweight setup, see Light Enough for Blue Skies, Ready for Rain: The Shelter System Minimalist Backpackers Actually Trust.
For this article, we will stay focused on the basics: what each part does, how common tarp pitches work, and what tradeoffs beginners should understand before using a flat tarp overnight.
This article contains affiliate links. If you purchase through these links, MoreHiking may earn a commission at no additional cost to you. We only recommend gear we trust and have carefully researched.
What Is a Flat Tarp Shelter System?
A flat tarp is usually a square or rectangular sheet of waterproof fabric.
Unlike a tent, it does not have one fixed shape. You decide how to pitch it based on the weather, the campsite, and how much protected space you need.
That flexibility is the main reason hikers like flat tarps.
On a calm summer night, you can pitch the tarp high and open so air moves through easily. In colder rain or wind, you can pitch it lower to the ground for more protection.
The same tarp can become several different shelters.
That is also what makes flat tarps harder for beginners than regular tents. A tent usually has one main setup. A tarp gives you choices. Those choices are useful, but they take practice.
If you are still comparing tarp shelters with enclosed options, you may also want to look at 5 Best Hiking Tents for Solo Hikers or 5 Best Ultralight Hiking Tents for Ultimate Outdoor Adventures.
The Four Main Parts of a Flat Tarp Shelter System
A flat tarp works because several small pieces work together.
If one part is missing or poorly set up, the shelter may sag, flap, or fail to protect your sleep system.
For a beginner, it helps to think of the system in four parts.
Before getting into each one, it helps to see the whole setup at a glance. The infographic below shows the four basic parts that work together to make a flat tarp shelter effective.
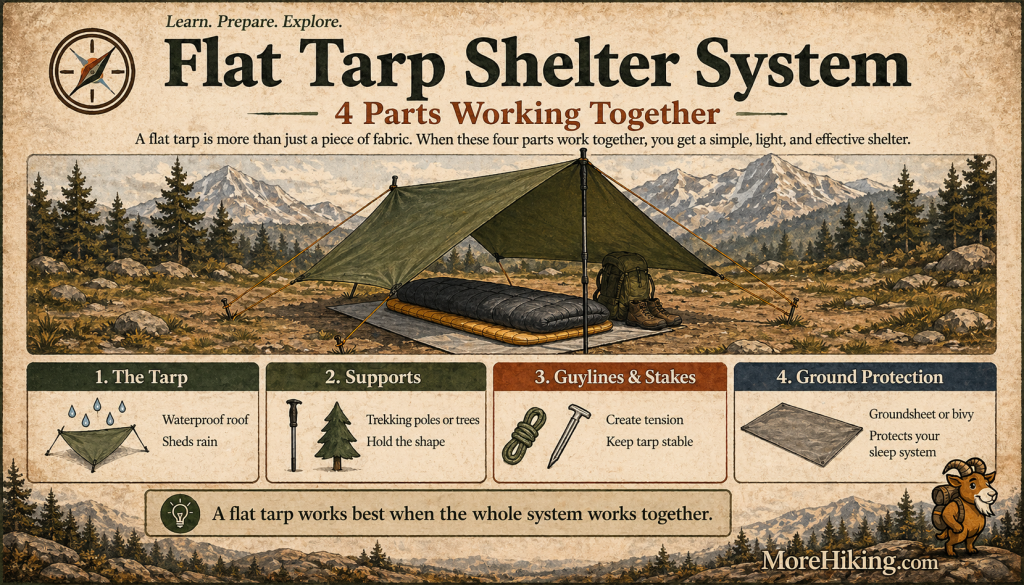
Once that big-picture view makes sense, the individual parts are much easier to understand.
1. The Tarp
The tarp is the roof of the shelter.
It blocks falling rain and creates a protected space underneath. Most hiking tarps are made from lightweight waterproof fabrics such as SilNylon, SilPoly, or Dyneema Composite Fabric, often called DCF.
The tarp itself has tie-out points around the edges and sometimes across the middle. These are reinforced loops or tabs where you attach guylines.
The more tie-out points a tarp has, the more pitching options you usually have. But beginners do not need to use every tie-out right away.
A simple A-frame pitch may only use the corners, ridgeline points, and a few side tie-outs.
For examples of tarp options, see 5 Best Hiking Tarps for Rain Protection.
2. The Supports
A tarp needs something to hold it up.
Many hikers use trekking poles because they are already carrying them. This is one reason tarps can save weight compared with tents that need dedicated poles.
You can also use trees. In wooded areas, a ridgeline can be tied between two trees, and the tarp can be pitched over that line.
Both methods work, but they feel different.
Trekking poles give you more control in open campsites. Trees can make setup easier in forests, but only if the trees are in the right place.
For more on pole options that can also support a shelter, see 5 Best Trekking Poles for Hiking Tents.
3. The Guylines and Stakes
Guylines are the cords that pull the tarp into shape.
Stakes hold those cords to the ground.
This is where many beginners struggle at first. A flat tarp does not have a rigid frame like a tent. It becomes strong because the fabric is pulled tight from different directions.
Loose guylines allow the tarp to flap in the wind. A sagging tarp can collect water, press against your sleeping bag, or become noisy through the night.
A good tarp pitch should look clean and firm, not wrinkled and droopy.
You do not need to become a knot expert overnight. Many modern tarps use small tensioning devices called linelocs. These help you tighten guylines without tying complicated knots.
Still, it is worth learning a few simple knots over time. A bowline, taut-line hitch, and trucker’s hitch can help when hardware breaks or when you need to tie off to a tree, branch, or rock.
4. The Ground Protection
A flat tarp usually has no floor.
That means you need to think about what goes between you and the ground.
Most beginners use one of three options.
A simple groundsheet is the lightest choice. This may be a piece of Tyvek, polycryo, or similar material. It protects your sleeping pad and sleeping bag from dirt, damp ground, and abrasion.
A bivy sack gives more protection. It is a lightweight cover that goes around your sleeping bag or quilt. Some bivies help block splash-back, wind, bugs, and light moisture.
A bug bivy or mesh inner gives insect protection. This is helpful in mosquito season, tick country, or warm areas where insects are a major concern.
The right choice depends on the conditions.
In dry, bug-free weather, a groundsheet may be enough. In wet or buggy conditions, a bivy or mesh insert can make the tarp system feel much more secure.
For more help choosing the layer under your sleep system, see 5 Best Hiking Groundsheets for Every Terrain. This article is listed in the MoreHiking Shelter category, though I would verify the exact URL in WordPress before publishing because the direct page did not open cleanly during my check.
For bivy options, see 5 Best Hiking Bivy Sacks.
The Simple Beginner Rule: Pitch Higher for Comfort, Lower for Protection
Before learning specific tarp pitches, beginners should understand one simple rule.
A higher pitch gives you more comfort.
A lower pitch gives you more protection.
When a tarp is pitched high, you get more headroom, better airflow, and a more open feeling. This is nice in warm weather and calm conditions.
But a high pitch also leaves more space for wind, rain spray, and cold air to move underneath the tarp.
When a tarp is pitched low, the edges sit closer to the ground. This gives you better protection from wind and rain. It also reduces splash-back, which happens when raindrops hit the ground and bounce mist under the tarp.
The tradeoff is space. A low pitch can feel tighter, darker, and less comfortable to sit under.
A good beginner rule is this:
Pitch high and open in calm weather. Pitch low and tight when the weather turns rough.
This article will only cover the basic idea. For a deeper look at reading wind, rain, and weather patterns before choosing your shelter setup, see How Experienced Backpackers Read Weather Forecasts for Shelter Decisions.
Common Flat Tarp Pitches Beginners Should Know
A flat tarp can be pitched in many ways, but beginners do not need to learn them all at once.
Start with a few simple shapes. Once those feel natural, you can experiment with more advanced pitches.
The three most useful beginner pitches are the A-frame, the lean-to, and the C-fly. The table below gives you a quick overview before we look at each one more closely.
Quick guide: Start with the A-frame, use the lean-to for fair weather, and practice the C-fly before relying on it overnight.
| Pitch | Best For | Beginner Tradeoff |
|---|---|---|
| A-Frame | Most beginner trips, light rain, and general three-season use | Best balance of simplicity and protection, but wind direction still matters |
| Lean-To | Fair weather, views, airflow, and relaxed camp setups | Very open, but less protective if wind or rain shifts |
| C-Fly | More coverage around your head and upper body | More protective than a lean-to, but takes more practice to pitch well |
The A-Frame Pitch
The A-frame is the classic beginner tarp pitch.
In this setup, the tarp forms a long ridge down the middle, with both sides sloping toward the ground. It looks a bit like the roof of a small house.
The A-frame is popular because it is easy to understand. Rain runs down both sides. The shape is stable when pitched well. It also gives you a protected sleeping space underneath the center ridge.
You can create an A-frame with two trekking poles, one at each end of the ridgeline. You can also hang the tarp over a ridgeline tied between two trees.
The most important choice is direction.
Do not aim the open end of the tarp directly into strong wind. If the wind blows into the open end, the tarp can act like a tunnel or scoop. This can make the shelter noisy, uncomfortable, and less secure.
Instead, try to angle the tarp so one sloped side blocks the wind.
For beginners, the A-frame is usually the best pitch to learn first. It is simple, useful, and works in many mild to moderate conditions.
This article explains how the A-frame works. For help deciding whether a tarp is actually enough for the night ahead, see When is a Tarp Enough? How to Decide Based on Conditions, Not Fear.
The Lean-To Pitch
The lean-to is one of the most open tarp pitches.
One long side of the tarp is staked near the ground, while the other side is raised up with trekking poles, trees, or branches. This creates a wide open front.
The lean-to is comfortable in fair weather. It gives you a good view, lots of airflow, and plenty of space to sit under cover.
But the lean-to is not the best choice for shifting wind or heavy rain.
Because one side is wide open, wind can blow rain under the tarp if the direction changes. It is also less protective if rain is bouncing off hard ground near the open side.
The lean-to is best for calm conditions, light rain, or campsites where you are confident about wind direction.
Beginners should think of the lean-to as a fair-weather comfort pitch, not a storm pitch.
The C-Fly Pitch
The C-fly is a more protective variation.
In this setup, part of the tarp forms a roof, while another part folds underneath or close to the ground. From the side, the shape can look a little like the letter C.
The C-fly can give you more wind protection than a lean-to. It can also create a partial ground barrier, depending on how the tarp is folded and staked.
This pitch is useful when you want more coverage around your head and upper body but still want a lightweight, open shelter.
The tradeoff is that it takes more practice.
A C-fly can feel awkward the first few times you set it up. It also depends on tarp size. A smaller tarp may not give enough coverage to make the pitch worthwhile for a beginner.
If you are new to flat tarps, learn the A-frame first. Then practice the lean-to and C-fly in calm weather before depending on them overnight.
How a Flat Tarp Protects You from Rain
A flat tarp protects you from rain in two ways.
First, it blocks rain falling from above.
Second, it helps direct water away from your sleeping area.
That second part is easy to overlook.
A tarp needs enough slope for water to run off. If the fabric is too flat or loose, water can collect in low spots. This can stretch the fabric, create sagging, and eventually drip or collapse onto your sleep system.
That is why tension matters.
The tarp should be tight enough that rain runs off instead of pooling. You do not need to pull every line as hard as possible, but the fabric should have a clean shape.
Site choice also matters.
A tarp does not have a bathtub floor like many tents. If you sleep in a low spot where water collects, your tarp may keep rain off your head while water still runs under your sleeping pad.
Look for slightly raised ground. Avoid shallow dips, dry creek beds, and places where water would naturally flow during a storm.
This article gives the short version because campsite selection is its own skill. For a deeper explanation, link this section to your campsite-selection post: Minimalist Hiking: Choosing a Campsite That Does the Work for You. I saw this linked from the existing “When is a Tarp Enough?” article as a related internal link, but I would confirm the exact WordPress URL before publishing.
Understanding Splash-Back
Splash-back is one of the most important tarp concepts for beginners.
It happens when raindrops hit the ground near your tarp and bounce upward as mist or small droplets.
If your tarp is pitched high, that spray can blow or bounce under the edges. Over time, it can dampen your quilt, sleeping bag, or gear.
This is one reason a tarp can feel dry at first but less comfortable after hours of heavy rain.
The solution is simple in principle.
In wet weather, pitch the tarp lower. If wind is coming from one direction, pin the windward side closer to the ground. This creates a better barrier and reduces the amount of spray that reaches your sleeping area.
A groundsheet or bivy can also help.
But the best defense is a smart pitch and a good campsite.
Avoid hard-packed bare ground when possible. Forest duff, pine needles, grass, and soft soil usually create less splash than compacted dirt.
How a Flat Tarp Handles Wind
Wind changes everything with a tarp.
In calm weather, almost any decent pitch can feel comfortable. In wind, small mistakes become more obvious.
The tarp may flap. Stakes may loosen. The fabric may press inward. Rain may blow sideways under the edges.
The key is to reduce the amount of wind that can get underneath the tarp.
A lower pitch usually helps. So does placing the narrow or sloped side toward the wind. Natural windbreaks can also make a big difference.
Look for sheltered campsites near trees, shrubs, boulders, or gentle terrain features. Avoid exposed ridges, open saddles, and low passes where wind may funnel through.
Do not depend on the tarp alone to solve every wind problem.
A flat tarp works best when your campsite helps protect it.
For more detail on connecting wind, terrain, and shelter choices before a trip, see How Experienced Backpackers Read Weather Forecasts for Shelter Decisions.
Choosing a Beginner-Friendly Tarp Size
Flat tarps come in different sizes.
Common examples include 5 x 8 feet, 8 x 10 feet, and 9 x 9 feet.
For beginners, bigger is usually easier.
A very small tarp can save weight, but it gives you less room for error. Your pitch has to be better. Your site selection has to be better. Your gear has to be placed more carefully.
An 8 x 10 tarp is often a good starting size for a solo hiker.
It gives enough coverage for many common pitches without feeling extreme. It also gives you more room to protect your pack, shoes, and sleep system.
A larger tarp will weigh more, but it can be more forgiving while you are learning.
That matters.
Beginner gear should not only be light. It should help you build confidence.
Tarp Fabric: Simple Beginner Explanation
Tarp fabrics can get technical quickly, but beginners only need to understand the basic tradeoffs.
SilNylon is common, durable, and usually more affordable. It packs small and works well, but it can stretch when wet. That means the tarp may sag during the night, and you may need to tighten the guylines again.
SilPoly is similar in use but usually stretches less than SilNylon when wet. It has become a popular choice for lightweight tarps.
DCF, or Dyneema Composite Fabric, is very light and does not stretch much. It stays tight after you pitch it. The downside is cost. DCF tarps are usually much more expensive. They can also be bulkier to pack.
For most beginners, SilNylon or SilPoly is the better place to start.
They are less expensive, easier to experiment with, and more forgiving while you learn.
DCF may be worth considering later if you already know you enjoy tarp camping and want to reduce weight further.
Don’t just hike—be prepared. Shop Camping Survival.
The Biggest Tradeoffs of a Flat Tarp Shelter System
A flat tarp has real advantages.
It is light, compact, flexible, and open to the landscape around you. It can make hiking feel simpler and more connected to the outdoors.
But it also has real tradeoffs.
You do not get a built-in floor. You do not get built-in bug protection. You do not get the same enclosed feeling as a tent. You also need to make more decisions when setting up camp.
For some hikers, that is part of the appeal. For others, it may feel like too much work. Neither reaction is wrong.
A tarp is not automatically better than a tent. It is better for certain hikers, certain trips, and certain conditions.
The question is not, “Is a tarp the best shelter?”
The better question is, “Is a tarp the right shelter for this trip, this weather, and my current skill level?”
That is the mindset beginners should bring to tarp camping.
For greater confidence in the decision to use a Flat Tarp, see Hiking Light Without Feeling Reckless: Building Confidence in Minimalist Shelter.
To understand the right conditions, see When is a Tarp Enough? How to Decide Based on Conditions, Not Fear.
Common Beginner Mistakes with Flat Tarps
Most tarp problems come from a few simple mistakes.
The first mistake is pitching too high in poor weather. A high pitch feels roomy, but it allows wind and rain spray to move underneath.
The second mistake is choosing a poor campsite. A tarp cannot fix a low spot where water collects. For more help with the campsite selection use visit our post on Minimalist Hiking: Choosing a Campsite That Does the Work for You.
The third mistake is not practicing before the trip. A tarp pitch that seems simple in a video can feel confusing when the light is fading and rain is starting.
The fourth mistake is using weak anchors. In soft soil, a small stake may pull out under tension. In rocky ground, a stake may not go in far enough.
The fifth mistake is expecting a tarp to behave like a tent. A tarp is more open. It requires more attention. It gives you more flexibility, but it also asks for more skill.
The good news is that these mistakes are easy to reduce with practice.
Set up your tarp in a yard, park, or local campsite before using it on a longer trip. Try pitching it high, low, tight, and loose. Watch how the shape changes. That practice is the best teacher.
Is a Flat Tarp Good for Beginners?
A flat tarp can be good for beginners, but it depends on the beginner and the trip.
It is not the easiest shelter to use. A basic tent is usually simpler for a first overnight hike.
But a tarp can be a good beginner shelter if you start slowly.
Choose mild weather. Camp in a familiar area. Practice the pitch before leaving home. Bring a groundsheet or bivy. Avoid your first tarp trip during heavy rain, cold wind, or peak bug season.
A flat tarp teaches useful outdoor skills.
It helps you notice wind direction. It makes you pay attention to ground slope. It teaches you how tension works. It encourages better campsite selection.
Those skills can make you a better hiker even if you still use a tent on many trips.
So yes, a beginner can learn a flat tarp shelter system.
Just do not make your first lesson harder than it needs to be.
For a broader discussion of building confidence with lighter shelters, see Hiking Light Without Feeling Reckless: Building Confidence in Minimalist Shelter.
Frequently Asked Questions About Flat Tarp Shelter Systems
Do I need trekking poles to use a flat tarp?
No, but trekking poles are very useful. Many hikers use trekking poles as the main supports for their tarp. If you do not use trekking poles, you can sometimes pitch the tarp between trees or use separate tarp poles. In open areas, trekking poles give you more options.
For shelter-friendly pole options, see 5 Best Trekking Poles for Hiking Tents in 2026.
Will bugs be a problem under a flat tarp?
They can be. A flat tarp alone does not protect you from mosquitoes, ticks, flies, or other insects. In buggy areas, you may want to add a bug bivy or mesh inner. This gives you insect protection while still keeping the tarp system lighter and more flexible than many full tents. In cooler shoulder seasons, when bugs are less active, you may not need the extra mesh.
For bivy-style protection options, see 5 Best Hiking Bivy Sacks in 2026.
Is a flat tarp waterproof enough for rain?
Yes, a good flat tarp can protect you from rain when it is pitched well. The challenge is not usually the fabric; the challenge is the setup. You need enough slope for water to run off, good tension, and to avoid low ground where water collects. A tarp can work well in rain, but it requires more attention than a tent.
For a deeper weather-focused discussion, see How Experienced Backpackers Read Weather Forecasts for Shelter Decisions.
What size flat tarp should a beginner choose?
For a solo beginner, an 8 x 10 tarp is often a good starting point. It gives enough coverage to make learning easier. Smaller tarps save weight, but they leave less room for mistakes. A slightly larger tarp may be worth the extra weight while you are building confidence.
For product examples, see 5 Best Hiking Tarps for Rain Protection in 2026.
Is a flat tarp better than a tent?
Not always. A flat tarp is usually lighter, more flexible, and more open. A tent is usually easier, more enclosed, and better at blocking bugs without extra pieces. The best shelter is the one that fits your trip, weather, comfort level, and experience.
For tent-based options, see 5 Best Hiking Tents for Solo Hikers in 2026.
Final Thoughts: Start Simple and Learn the System
A flat tarp shelter system is not just a lighter version of a tent.
It is a different way of thinking about shelter.
Instead of relying on a fixed structure, you learn to use fabric, poles, cord, stakes, ground shape, and wind direction together. That takes practice, but it also builds confidence.
You do not need to master every pitch before trying a tarp. Start with the A-frame. Practice in calm weather. Learn how high and low pitches feel. Watch how rain runs off the fabric. Notice how wind moves around your campsite.
Over time, the tarp starts to feel less like a risky shelter and more like a useful skill.
For beginners, that is the real value.
A flat tarp can help you carry less, pay closer attention, and understand your campsite in a deeper way. Used carefully, it can be a simple and effective shelter system for the right conditions.
The key is to start small, practice first, and let your skills grow before relying on it in harder weather.
If you have enjoyed this article, please also read our other post.
When is a Tarp Enough? How to Decide Based on Conditions, Not Fear.


Leave a Reply