
By Kelley Kelly, Guest Contributor
Many hikers feel a wave of relief the moment they catch sight of the trailhead and hear the click of their car doors unlocking. You drop your heavy pack, kick off your boots, and pour yourself a cold drink, thinking the journey is officially over. However, if you are hitting the trail with a canine companion, the hike is not actually finished when you reach the car. A good trail partner does not simply unclip the leash, load the dog into the vehicle, and call the trip complete. The last part of any good hike is the post-hike dog recovery check. It is a quiet, practical routine that is incredibly easy to skip when you are tired, but it remains one of the absolute best ways to protect your dog after a long day outside.
Before you build this recovery habit, it helps to understand the bigger planning picture. Our complete guide to backpacking with dogs explains how recovery fits into the full trail-ready system, ensuring you and your pup are prepared from the first mile to the final stretch.
Why Dogs Need a Post-Hike Recovery Routine
On the trail, a dog will often keep moving even when something is starting to bother them. Because they are excited, highly overstimulated, intensely loyal, or simply trying their best to stay with their pack, they tend to mask discomfort. A minor scrape, a hot spot from a harness, or a small thorn between their toes might not cause them to pause while the adrenaline is flowing. Once they finally cool down and the excitement of the trail fades, those small issues become much easier to see.
A post-hike recovery check is not about assuming something went wrong on your adventure. It is simply about giving your dog a quiet second look when they are relaxed enough to let you know how they are really feeling. By catching minor irritations like a torn nail, a rubbing strap, or a hidden tick immediately, you can treat them before they turn into painful infections or require an unexpected trip to the emergency clinic.
The 10-Minute Post-Hike Dog Recovery Check
Once you get back to your vehicle or set up your basecamp, take ten minutes to run through a systematic physical assessment. Doing this in the exact same order every time ensures you never accidentally overlook a hidden problem.
Step 1: Let Your Dog Cool Down Before the Full Check
When you first reach the trailhead, resist the urge to jump straight into a full nose-to-tail inspection. Your dog may still be in “hike mode,” panting hard, scanning the area, pulling toward smells, or trying to stay alert after the excitement of the trail. Start by moving them into deep shade, an air-conditioned vehicle, or another cool, well-ventilated area. Remove their pack, harness, or any restrictive gear right away so heat can escape more easily and you can see how their body is recovering.
Offer small amounts of water at a time, but do not force them to drink. Give them a few quiet minutes to rest while you watch their breathing, posture, gum color, and general awareness. Normal post-hike panting should gradually improve once your dog is resting in a cool place. If their breathing begins to settle, their body language relaxes, and they seem alert and responsive, you can move into the full physical check.
However, if your dog seems overheated, treat cooling as the priority before inspection. Warning signs include excessive panting that does not improve with rest, thick drooling, bright red or very pale gums, weakness, wobbliness, confusion, vomiting, diarrhea, collapse, or unusual lethargy. These signs should not be brushed off as ordinary tiredness. Heat stress can become dangerous quickly, especially in puppies, senior dogs, overweight dogs, thick-coated dogs, flat-faced breeds, and dogs with breathing or heart conditions.
If you are concerned that your dog is overheating, stop all activity, move them into shade or air conditioning, and contact a veterinarian or emergency clinic while you begin cooling. Wet the dog with cool—not ice-cold—water, making sure the water reaches the skin, and create airflow with a fan, breeze, open windows, or air conditioning. Do not immerse the dog in very cold water. Continue monitoring them while arranging veterinary care, because heatstroke is a medical emergency.
If your dog settles normally after routine exertion and remains alert and comfortable, you can continue with the post-hike recovery check. If their panting remains intense, they seem disoriented, they cannot stand normally, their gums look abnormal, or they worsen after a brief rest, skip the rest of the trailhead routine and seek veterinary care immediately.
Step 2: Remove the Pack or Harness and Check Contact Points
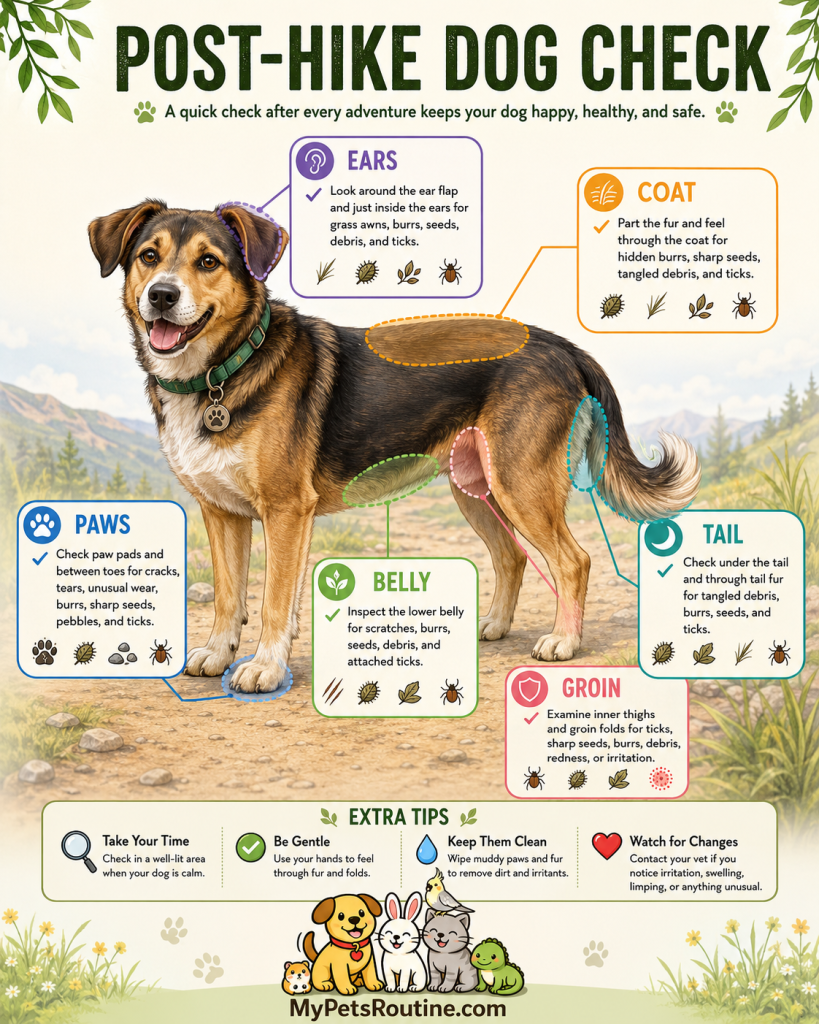
If your pup carries their own gear, slide the pack or harness off immediately and run your hands over their skin. You want to pay close attention to the primary friction points where straps sit against the body. Feel underneath the chest straps, belly straps, the delicate skin in the armpit area, around the collar, across the shoulders, and directly behind the elbows. Look for missing fur, skin redness, or small bumps that indicate chafing. Catching these spots early tells you if you need to adjust the fit or lighten their load before the next outing. Before the next outing, use our dog backpacking gear system to review pack fit, load balance, and what your dog should carry. If the irritation came from the harness itself, our guide to dog hiking harnesses with handles can help you reassess fit, padding, support, and trail control.
Step 3: Check the Paws First
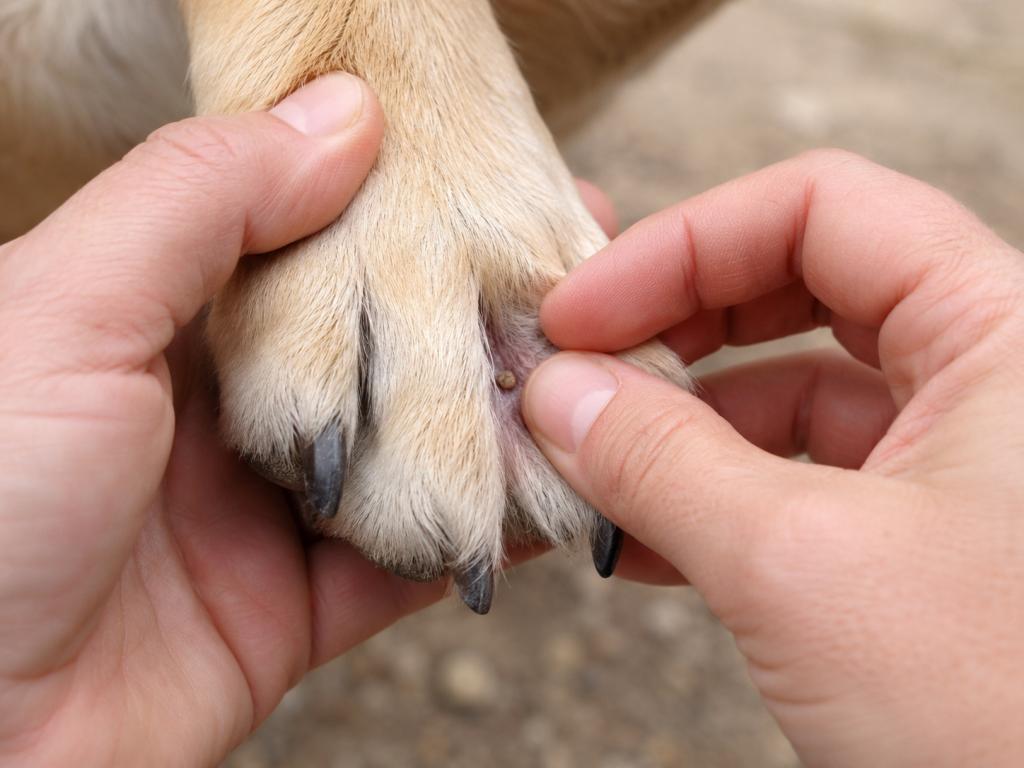
Paw problems are among the most common trail injuries, and a proper paw check should never be saved only for instances when they are obviously limping. A paw problem may be present before a limp becomes obvious, so check the paws even when your dog appears to be walking normally. Gently lift each paw and inspect the main pads and the softer pad edges for cracks, tears, or unusual wear. Press lightly between the toes to check for embedded gravel, sharp burrs, pine needles, or thorns. Don’t forget to examine the areas around the nails and check the dewclaws for splits. If you have been walking on wet trails or through stream crossings, look closely for softened, raw skin that might become tender once it dries out. If you find a torn pad, split nail, embedded object, or another trail injury, our canine trail and emergency first aid guide explains what to carry, what to check, and when to turn around or seek help.
Step 4: Check the Coat, Belly, Groin, Tail, and Ears
Next, run your hands thoroughly through your dog’s coat, moving slowly against the direction of hair growth so you can feel anything hidden close to the skin. You are looking for burrs, sharp seeds, tangled debris, small cuts, and ticks. Ticks are especially easy to miss because they often settle into warm, protected areas of the body where the fur is thicker or the skin folds naturally. Check inside and behind both ears, around the eyelids, under the collar, beneath the front legs, through the armpit area, along the belly, throughout the groin, between the back legs, between the toes, and around the base and underside of the tail.
If you find a tick crawling on your dog, remove it from the coat before it has a chance to attach. If the tick is already attached to the skin, remove it as soon as possible using fine-tipped tweezers or a proper tick-removal tool. Grasp the tick as close to the skin as you can and pull upward with steady, even pressure. Do not twist, jerk, burn the tick, cover it with petroleum jelly, or use nail polish to try to make it back out. Those methods can make removal messier and may increase irritation at the bite site.
After the tick is removed, clean the area and wash your hands. If possible, take a clear photo of the tick or place it in a sealed bag or container in case your veterinarian wants to identify it later. Over the next several days, watch the bite area for swelling, spreading redness, discharge, or tenderness. Also monitor your dog for fever, unusual tiredness, loss of appetite, lameness, joint soreness, wobbliness, or behavior that feels “off.” If you notice any of these signs, if part of the tick appears stuck, or if your dog has had multiple tick bites, contact your veterinarian for guidance.
For dogs who hike regularly, this post-hike tick check should work together with a veterinarian-approved tick-prevention plan. Tick risk varies by region, season, trail type, and your dog’s lifestyle, so ask your vet which prevention product is safest and most effective for your dog before your hiking season begins.
Step 5: Watch Your Dog Walk
Before you ask your dog to jump into the back of your vehicle, take a moment to watch how they move on level ground. This step is easy to overlook, but it can reveal soreness, paw pain, joint strain, or a small injury that was not obvious while your dog was still excited on the trail. Encourage your dog to walk slowly a few steps away from you, then back toward you. If possible, watch them from the side and from behind so you can compare how evenly they are using all four legs.
Look for subtle changes, not just a dramatic limp. A dog who is recovering normally may look tired, move a little slower, or seem mildly stiff after a long hike, especially if they are older or the terrain was rocky. However, they should still place weight evenly on their legs, remain alert, and loosen up as they move gently. Mild stiffness that improves after a few careful steps is usually less concerning than pain that becomes more obvious with movement.
Pay close attention to hesitation, uneven steps, head bobbing, hip dipping, dragging a paw, shortened stride, stiffness that does not improve, or a reluctance to turn, sit, stand, climb, or step into the vehicle. Also watch for repeated paw licking, sudden stopping, whining, trembling, or looking back at a specific leg or foot. These can be signs that something is sore, strained, cut, bruised, or stuck between the toes.
Do not force your dog to jump into the car if they seem stiff, sore, or uncertain. Help them in with a ramp, lift them carefully if it is safe to do so, or give them more time to rest before loading up. Jumping after a strenuous hike can add stress to tired muscles and joints, especially for senior dogs, puppies, small dogs, large breeds, and dogs with known hip, knee, back, or arthritis issues.
If you notice a clear limp, refusal to bear weight, visible swelling, obvious pain when touched, dragging of a limb, sudden weakness, collapse, or worsening mobility after a short rest, skip home care and contact your veterinarian. A dog who is only mildly tired should gradually settle and improve. A dog whose movement looks painful, unstable, or clearly different from their normal baseline needs professional guidance.
Hydration, Food, and the First Hour After the Hike
The first hour after a hike should be calm, cool, and controlled. Your dog may be thirsty, hungry, excited, tired, or overheated all at once, so this is not the moment to let them gulp a huge bowl of water or dive straight into a full meal. Start with rest first. Move them into shade, open airflow, or an air-conditioned space, remove their hiking gear, and let their breathing begin to settle.
Offer water in small, repeated amounts instead of one large serving all at once. Most dogs can drink normally after exercise, but an exhausted or overheated dog may drink too quickly and vomit. For large, deep-chested breeds or dogs already at higher risk for bloat, extra caution is wise after strenuous activity. Let them take a few drinks, pause, rest, and then offer more. If they refuse water completely, seem unable to drink normally, vomit repeatedly, or appear weak, wobbly, confused, or unusually lethargic, treat that as a warning sign rather than simple tiredness.
Food should wait until your dog is calm, cooler, and breathing comfortably. Avoid offering a full meal while they are still heavily panting, overheated, nauseous, restless, or worked up from the trail or car ride. Once they are settled, alert, and acting like themselves again, you can offer their normal meal. For dogs prone to stomach upset, or for dogs who completed a longer or harder hike than usual, a smaller meal first may be easier on the stomach than a large bowl of food all at once.
It is also important to know the difference between ordinary thirst and a potential emergency. Bloat, also called gastric dilatation-volvulus or GDV, is rare compared with simple post-hike thirst, but it is life-threatening and requires immediate veterinary care. Watch for a swollen or tight-looking abdomen, repeated unsuccessful retching or dry heaving, heavy drooling, sudden restlessness, trouble breathing, collapse, weakness, or an inability to stand. If you see these signs, do not wait to see if your dog “sleeps it off.” Contact an emergency veterinarian immediately.
For most healthy dogs, the goal is simple: cool down first, offer small water breaks, delay the full meal until they are fully settled, and monitor their behavior closely during the first hour after the hike. A dog who gradually relaxes, drinks normally, breathes comfortably, and remains alert is usually recovering well. A dog who becomes weaker, more restless, more nauseous, or less responsive needs professional guidance.
What Is Normal Tiredness After a Hike?
It is entirely expected for your dog to experience some level of fatigue after a hike that was longer or more strenuous than their daily neighborhood walks. The key here is determining whether your dog is resting normally or acting completely unlike themselves. Every dog will recover at a different pace based on their age, breed, overall health, conditioning, the current weather, and the difficulty of the trail terrain.
| Post-Hike Indicator | Normal Tiredness | Warning Sign: Contact a Vet |
|---|---|---|
| Energy Level | Your dog sleeps deeply, rests more than usual, but still wakes up, responds to your voice, and seems aware of their surroundings. | Your dog is profoundly lethargic, difficult to wake, confused, disoriented, collapsed, or unwilling to move even for high-value rewards. |
| Mobility | Mild stiffness when first standing up, especially after a long rest, that improves after a few gentle steps. | Continuous limping, crying or whining when moving, refusing to bear weight, dragging a limb, visible swelling, or stiffness that worsens instead of improving. |
| Paws | Slight tenderness after rocky or rough terrain, but your dog still walks normally and allows you to inspect their feet. | Torn pads, bleeding, a split nail, persistent paw licking, swelling between the toes, embedded debris, or refusing to put a paw down. |
| Breathing and Panting | Panting that gradually slows once your dog is resting in shade, airflow, or an air-conditioned space. | Heavy panting that does not improve with cooling, rapid or shallow breathing, noisy breathing, weakness, wobbliness, collapse, or panting paired with vomiting, diarrhea, confusion, or abnormal gums. |
| Gum Color and Hydration | Gums are moist and a healthy pink color, and your dog can drink small amounts of water normally. | Very pale, gray, blue, bright red, dry, or sticky gums; heavy drooling; seeming unable to drink; or acting weak, dazed, or unstable. |
| Appetite and Water Intake | Your dog may skip food at first because they are tired, but drinks normally and eats later once fully settled. | Refusing both food and water for an extended period, repeated vomiting, worsening nausea, or refusing water while also acting lethargic or weak. |
| Stomach and Bloat Concerns | Mild post-exercise thirst that improves with small, controlled water breaks and rest. | Swollen or tight-looking abdomen, repeated unsuccessful retching or dry heaving, heavy drooling, sudden restlessness, trouble breathing, weakness, collapse, or inability to stand. |
| Behavior | Quieter than usual for the evening but still responsive, comfortable, and able to settle normally. | Restlessness, hiding, trembling, obvious pain when touched, unusual aggression, confusion, or behavior that feels clearly unlike your dog’s normal baseline. |
| Next-Day Recovery | A little slower the next morning but improving as they move around gently. | Limping, refusing stairs, refusing to jump, repeated paw licking, ongoing lethargy, poor appetite, or soreness that does not improve by the next day. |
On a mobile device, swipe left or right to view the full table.
The Next-Day Recovery Check
The next morning is often when the reality comes to light. Just like humans, a dog might look completely fine at the trailhead because their adrenaline is pumping, only to wake up the next morning with stiff muscles and tender joints. Before you start your normal routine the day after a big hike, take a moment to evaluate how your dog moves when they first get out of bed.
Observe how they stand up and whether they stretch out their limbs normally. Watch to see if they eagerly eat their breakfast and drink water, or if they seem too uncomfortable to bother with food. Pay attention to how they handle normal household obstacles; a dog who suddenly hesitates at the base of the stairs or avoids jumping onto the couch may be experiencing soreness, pain, or another source of discomfort. Also watch for repetitive paw licking, which can signal a hidden sting, cut, abrasion, or another source of irritation that you might have missed during your initial trailhead check. If your dog seems unusually quiet, reclusive, or restless, reduce their activity and monitor them closely. Contact your veterinarian if the symptoms persist, worsen, or appear painful. Your next-day check is incredibly valuable because it tells you exactly how well your dog is tolerating their mileage, providing a clear baseline as you work to build your dog’s trail conditioning gradually for future multi-day backpacking trips.
Use Recovery Notes to Plan the Next Hike
One of the best habits you can build as an outdoor handler is keeping a quick log of your dog’s post-hike condition. Tracking these details moves you away from guesswork and helps you develop real, experienced judgment over time. A trail-ready team is ultimately built through consistent observation, honest decisions, and small adjustments.
Your dog’s recovery notes are not just empty busywork. They serve as a permanent record that helps you choose better mileage, better rest breaks, safer terrain, and smarter timing on your next trip. If you notice your dog is consistently stiff the next morning after a ten-mile rocky hike but bounces back instantly from an eight-mile dirt trail, you have gained invaluable data on how to plan your next adventure safely.
Make Recovery Part of Every Hike
The trailhead is not quite the finish line when you hike with a dog. A calm cooldown, a careful nose-to-tail check, controlled water and food, and a next-day observation can help you notice problems that were hidden while your dog was active. Keep simple recovery notes, adjust future mileage and gear when necessary, and contact your veterinarian whenever your dog’s recovery looks painful, unstable, or clearly different from their normal pattern.
Frequently Asked Questions
How long should my dog rest after a hike?
Most dogs require a dedicated, quiet recovery period after a demanding day on the trail, but the exact amount of rest depends entirely on their age, fitness level, the trail difficulty, and the weather. A short, easy hike on a cool day might only require a calm evening on the couch. A long, hot, rocky, or multi-day backpacking trip will often necessitate one or two full days of significantly reduced activity to let their muscles fully recover.
Is it normal for my dog to limp after hiking?
Limping should never be dismissed as a normal side effect of exercise. A limp indicates discomfort and can be caused by a wide variety of issues, ranging from a simple raw pad or an embedded thorn to a torn nail, muscle strain, joint injury, or structural trauma. You should always perform a thorough paw check immediately, observe their movement on flat ground, and contact your veterinarian if the limp persists, worsens, or causes your dog visible distress.
Should I check my dog for ticks after every single hike?
Yes. Check your dog carefully for ticks after every hike, especially after travelling through wooded, brushy, or grassy areas and whenever local conditions make tick exposure possible. Ticks can be found in deep woods, coastal dunes, and simple brush alongside well-traveled trails. Focus your inspection on the warm, protected areas of their body, making sure to check deep inside the ears, around the eyelids, under their collar, beneath their front and back legs, and all the way around the tail.
What should I do if my dog’s paws are sore after a hike?
Start by getting your dog into a calm, comfortable space and performing a meticulous paw inspection under good lighting. Look closely for small cuts, worn skin, cracked pad perimeters, embedded gravel, or split nails. Keep your dog on resting status and strictly avoid walking them on rough asphalt, gravel, or hot pavement while they heal. If you notice active bleeding, deep tissue damage, significant swelling, or a persistent limp, have them evaluated by a veterinarian.
Can dogs get sore muscles just like humans do?
Dogs absolutely experience muscle stiffness and delayed onset soreness after an intense physical effort, especially if they are not fully conditioned for the specific distance, steep elevation, or rugged terrain of the hike. The next-day check is incredibly important because stiffness or discomfort may be easier to notice after a long rest or the following morning, revealing mobility limitations that were completely hidden while the dog was active on the trail.
About Kelley Kelly
Kelley Kelly writes at MyPetsRoutine.com, where she shares practical guidance about pet routines, everyday care, health, feeding, and pet ownership. She contributed this article to MoreHiking to help dog owners make safer and better-informed decisions when enjoying the outdoors with their pets.

Leave a Reply