
By Kelley Kelly, Guest Contributor
Editor’s note: This article was written by Kelley Kelly of MyPetsRoutine.com and reviewed and edited by MoreHiking for clarity, accuracy, and alignment with our beginner-focused hiking with a dog guidance.
Medical Disclaimer
This article is for general trail-planning and first aid awareness only. It is not a substitute for professional veterinary training, diagnosis, or treatment. If your dog is injured, in pain, overheating, unable to walk, vomiting repeatedly, bleeding heavily, collapsing, having trouble breathing, or acting unusually, contact a veterinarian or an emergency veterinary clinic as soon as possible.
Picture a perfect afternoon on the trail. The sun is filtering through the trees, the air is crisp, and your dog is trotting ahead with pure, unfiltered joy. Then, suddenly, they stop. They hold up a front paw, shake it, and look back at you with wide, confused eyes. Or maybe they simply slow to a crawl, panting heavily in a way that does not settle, refusing the water you pour into their bowl.
In these moments, the real challenge is not just whether you packed gauze, saline, or a spare bootie. The real challenge is deciding what the situation means for the rest of your trip.
A canine first aid kit matters, but it does not make decisions for you. On the trail, you may be tired, miles from the car, out of cell service, and entirely responsible for a companion who cannot explain what hurts. That is why trail first aid should be built around calm observation, simple supplies, and conservative choices.
In our complete guide to backpacking with dogs, we explain why first aid planning is about decisions, not just supplies. It is a mindset that prioritizes your dog’s safety over reaching the summit, finishing the loop, or sticking to the original plan.
What Canine Trail First Aid Can and Cannot Do
The goal of trail first aid is not to “fix” your dog in the backcountry. The goal is to pause, prevent the problem from getting worse, and make the safest next decision.
That distinction is important. Trail first aid can help you clean a small wound, protect a vulnerable paw, reduce movement, keep your dog calm, cool an overheated dog while seeking help, and get your dog safely off the trail.
However, it has strict limits. It cannot safely diagnose a fracture, replace professional veterinary care, treat severe heatstroke by itself, or make a dangerous route safe. First aid is temporary support, not a substitute for a veterinarian.
Bandages, splints, and painful limb injuries require particular caution. A poorly applied bandage or splint can restrict circulation, create pressure injuries, or make an existing injury worse. If your dog is in severe pain, the limb appears bent or misshapen, bone is visible, your dog cries out or resists handling, or they cannot bear weight, do not repeatedly bend, straighten, or manipulate the leg. Keep your dog as calm and still as possible, limit movement, and begin your evacuation plan. Unless you have received practical veterinary first aid training or are following direct veterinary instructions, do not attempt to splint a suspected fracture on the trail.
Build the Kit Around Real Trail Problems
Instead of treating your dog’s first aid kit like a random shopping pile of medical gear, it helps to group your supplies by the actual trail problems you are most likely to encounter.
Paw and Nail Problems
Paw injuries are incredibly common because hiking surfaces vary so much. A single afternoon can take your dog across loose gravel, abrasive rock, sharp roots, wet mud, thorny brush, or hot, sun-baked stone.
To prepare for paw and nail problems, carry sterile gauze pads, non-stick pads, self-adhering vet wrap, a small roll of medical tape, saline rinse, tweezers, a tick remover, and blunt-tip scissors. A lightweight towel and a spare bootie or paw cover are also very useful.
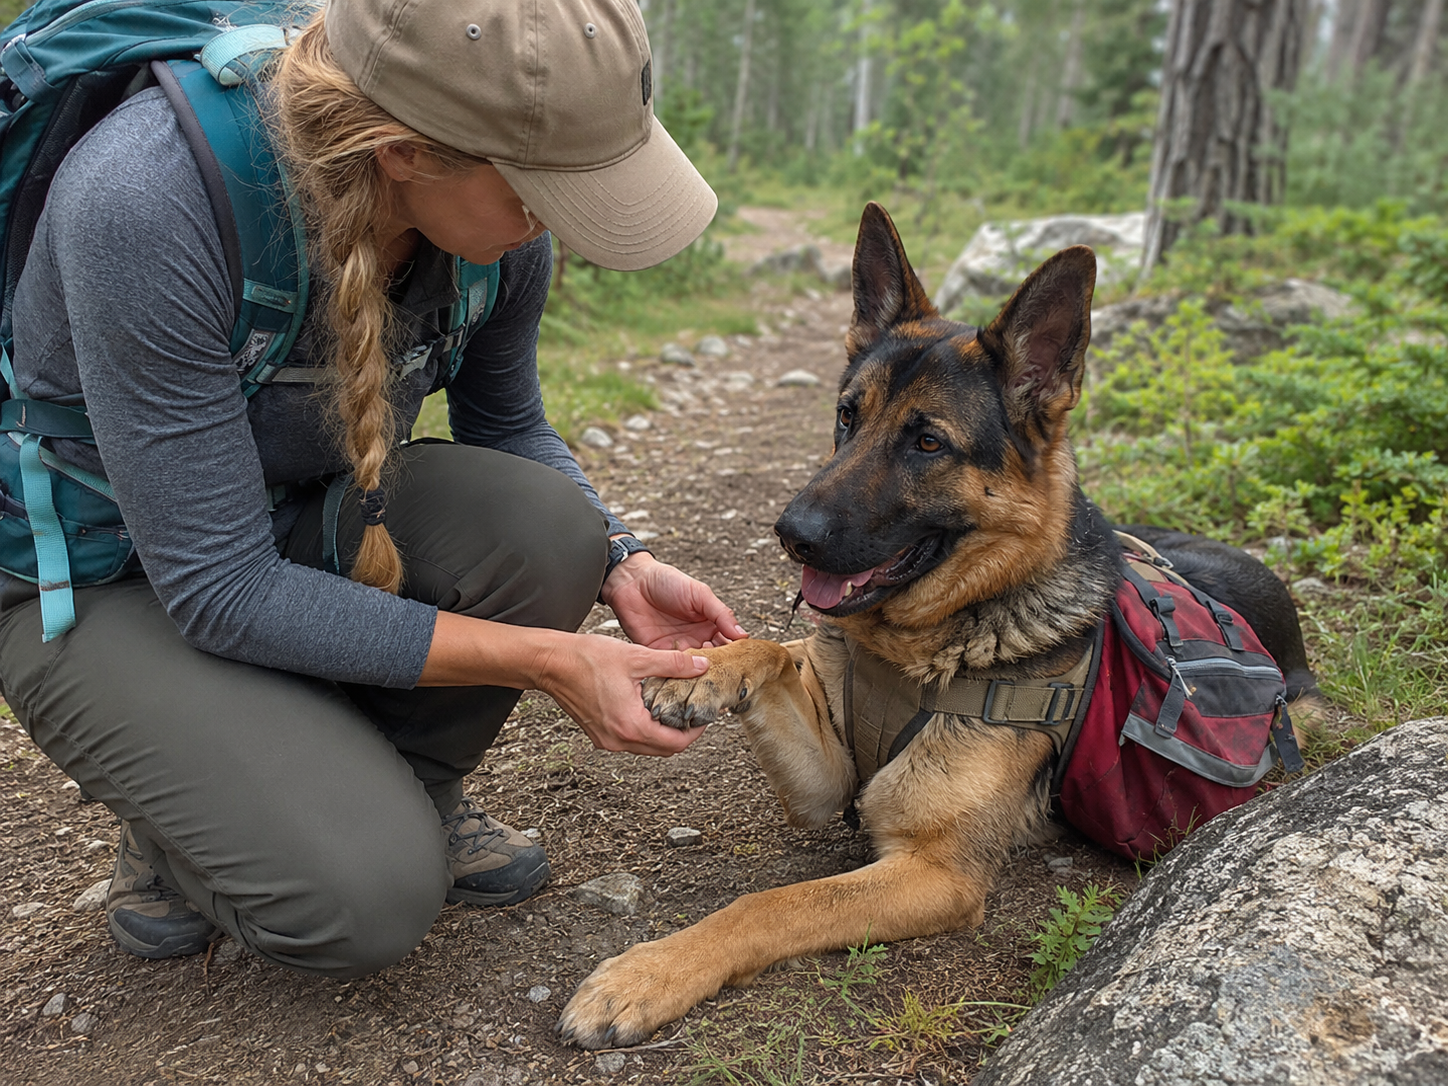
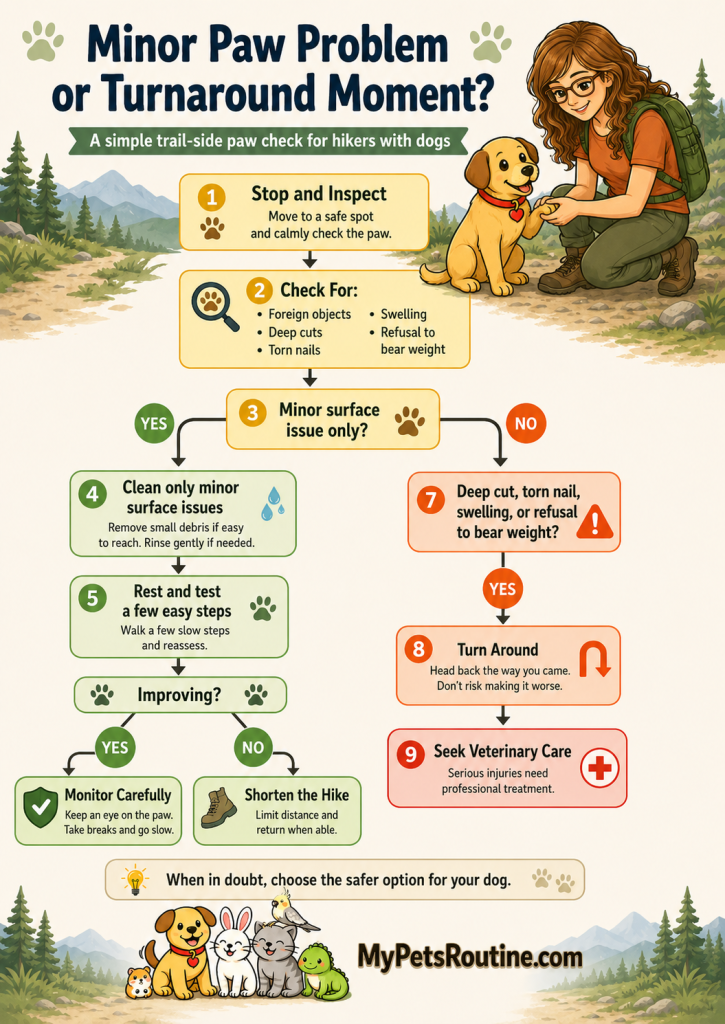
When a dog starts limping, begin with a methodical inspection if it is safe to do so. Check between the toes, along the pad edges, around the nail beds, and near the dewclaws. Look for gravel, thorns, burrs, grass awns, cuts, worn pads, torn nails, swelling, or repeated licking.
If you find a small pebble or other loose surface debris that is easy to grasp, you may gently remove it without digging into the paw. Rinse the area, rest, and reassess. Leave deeply embedded or firmly lodged material in place and arrange veterinary care.
Bleeding and Small Wounds
Bleeding and Small Wounds
For minor cuts and scrapes, carry sterile saline, clean gauze or cloth, non-stick wound pads, disposable gloves, and material for securing a temporary dressing.
If a wound is bleeding, place clean gauze or cloth directly over it and apply firm, continuous pressure. Avoid repeatedly lifting the material to check the wound because this can disturb early clot formation. If blood soaks through, leave the original material in place, add more clean layers on top, and continue applying pressure.
Once the bleeding has slowed, a small and superficial wound may be gently rinsed with sterile saline, covered with a clean non-stick dressing, and protected while you leave the trail. Limit your dog’s movement and arrange veterinary advice if the wound is painful, contaminated, swollen, or more than a minor surface scrape.
Heavy or persistent bleeding, rapidly soaked dressings, deep wounds, dirty punctures, animal bites, visible tissue damage, pale gums, weakness, or collapse require urgent evacuation and veterinary care. Do not delay leaving the trail while attempting repeated wound treatment.
The American Veterinary Medical Association recommends applying firm pressure with clean material and adding new layers rather than removing blood-soaked material.
Heat, Fatigue, and Overheating
Managing your dog’s temperature is less about what is inside your pack and more about route planning, timing, shade, hydration, and knowing when to stop.
Dogs do not cool themselves through full-body sweating the way people do. They rely heavily on panting, which makes heat, humidity, direct sun, poor conditioning, and strenuous terrain especially dangerous.
Always carry extra water, a collapsible bowl, a small towel or cloth for cooling, and a clear route exit plan. On remote hikes, also carry emergency contact information and consider a satellite communicator.
Watch for warning signs such as heavy panting that does not settle after rest, thick or excessive drooling, weakness, confusion, vomiting, diarrhea, collapse, or gums that look dark red, dry, sticky, pale, or abnormal.
Heatstroke is a life-threatening medical emergency. If your dog shows heavy panting that does not settle, weakness, confusion, vomiting, stumbling, collapse, or other signs of serious overheating, stop all activity immediately. Move your dog into shade, begin cooling, and arrange urgent transport to a veterinary hospital.
Wet your dog with cool—not ice-cold—water, making sure the water reaches the skin, and increase airflow with a fan, breeze, or vehicle air conditioning. Do not immerse an overheated dog in ice water, and do not delay veterinary transport while waiting to see whether the dog appears to recover. Heatstroke can cause internal organ damage even when the dog seems more alert after cooling.
Offer small amounts of water only if your dog is alert, able to swallow normally, and interested in drinking. Do not force water into the mouth of a weak, confused, vomiting, collapsing, or unconscious dog.
Carry-Out and Evacuation
This is one of the most important and most overlooked parts of dog hiking safety.
Before you set foot on a trail, ask yourself one honest question: Could I physically move my dog if they suddenly could not walk?
A 15-pound dog and a 75-pound dog create completely different rescue challenges. If you hike with a medium or large dog, especially on remote trails, an emergency rescue sling can be one of the most important items you carry. A strong primary leash, a backup cord, and a satellite communicator can also become vital tools if something goes wrong.
Your carry-out ability should influence the route you choose, whether you hike solo, how far you go, how technical the terrain is, and how conservative you are when the first warning signs appear.
The best emergency plan is not just having gear. It is choosing a route you can safely exit if your dog gets hurt.
For additional trail-control and brief lift-assist options, see our guide to dog hiking harnesses with handles.
The Trail First Aid Decision Pattern
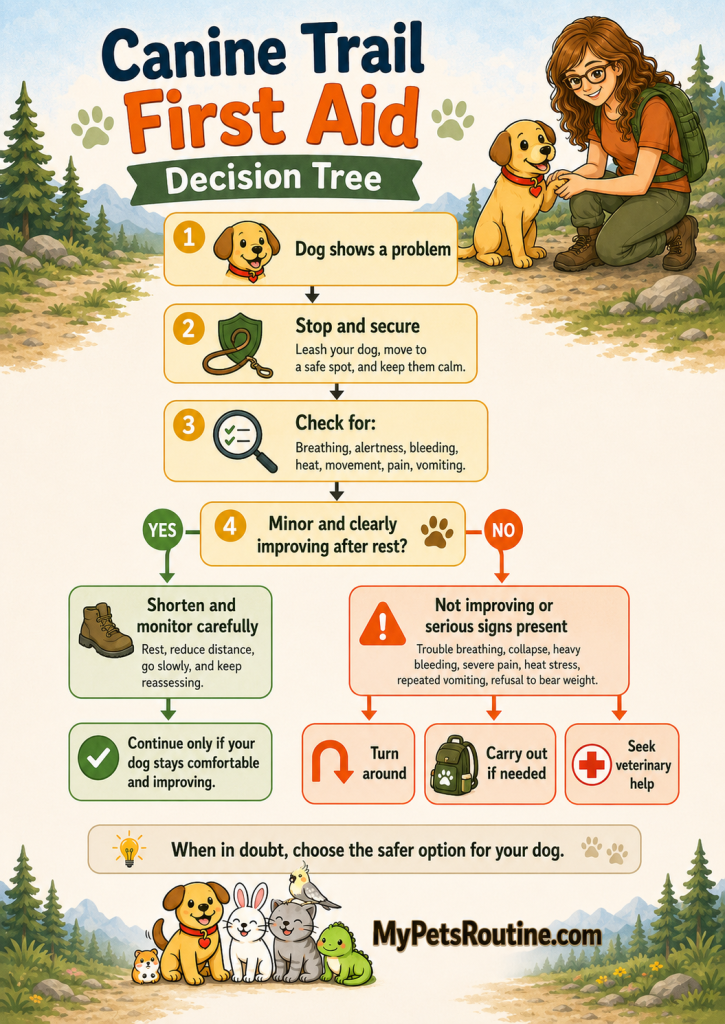
When a problem happens on the trail, rushing into a quick fix rarely helps. Instead, use a simple, repeatable decision pattern.
Stop
Stop moving immediately before the problem gets worse. If it is safe, move your dog out of the active trail corridor and away from other hikers, bikes, dogs, or hazards.
Secure
Clip the leash and prevent sudden movement. Even the friendliest dog may react defensively if they are frightened or in pain. Keep other hikers and passing dogs at a safe distance.
Assess
Look at the whole dog before focusing only on the obvious injury. Ask yourself: Is my dog alert and responsive? Are they breathing normally? Are they panting excessively? Can they stand comfortably? Is there active bleeding? Are they vomiting? Are their gums abnormal? Did the problem appear suddenly, or has it been building?
Stabilize
Do only what you can safely, calmly, and cleanly accomplish in a backcountry setting. That might mean rinsing dirt from a paw, applying steady pressure to a scrape, placing a loose protective wrap over a minor paw injury, moving into shade, cooling with water, or preparing to carry your dog out.
Decide
This is the heart of trail first aid. The question is not, “Can we somehow push through?” The better question is, “What is the safest next step for this dog?”
Your options may include resting and reassessing, shortening the route, turning around, carrying your dog out, contacting your veterinarian, or activating emergency help.
Common Trail Problems and What They Mean
Paw Cuts, Worn Pads, and Torn Nails
When inspecting a paw, look between the toes, around the pad edges, at the nail beds, and near the dewclaws. Watch for embedded debris, swelling, bleeding, torn nails, cracked pads, raw spots, or repeated licking.
For minor surface irritation, you may be able to rinse the paw, protect it with a bootie, and reassess after a short rest. However, if you see deep cuts, torn nails, torn pads, persistent limping, swelling, or refusal to bear weight, treat the hike as changed.
Turn around and contact a veterinarian. Torn or injured foot pads often need proper cleaning, professional bandaging, pain management, infection prevention, and close monitoring.
To help your dog recover well after a long day outside, consider adding a structured post-hike dog recovery protocol to your routine.
Limping on the Trail
A limp is information, not an inconvenience.
If you can identify an obvious, easily fixable cause, such as a small pebble between the toes, you can remove it gently, rest, and reassess. But if the cause is not obvious, the limp continues, your dog is painful, or your dog does not want to put weight on the leg, do not push forward.
Rest the dog completely. If the limp does not clear after a solid break, or if your dog is reluctant or unable to bear weight, turn around and contact your veterinarian.
If your dog is in severe pain, the leg looks misshapen, or your dog resists handling, do not repeatedly bend, stretch, or examine the limb. Keep them still and begin your exit plan.
Heat Stress and Heatstroke Concerns
Heat problems can develop quickly, especially on exposed routes, humid days, steep climbs, rocky terrain, or hikes where the dog is excited and overexerting themselves.
Watch closely for warning signs such as heavy panting that does not settle after rest, thick drooling, weakness, confusion, stumbling, vomiting, diarrhea, collapse, or abnormal gums.
If you suspect heat stress, stop all activity immediately. Move your dog to deep shade, begin cooling with cool water and airflow, and seek urgent veterinary care. Do not wait to see if things improve while continuing the hike. Heatstroke can become life-threatening quickly.
| Trail Problem | Primary Warning Signs | Immediate Backcountry Action |
|---|---|---|
| Paw or Nail Injury | Limping, licking, holding paw up, visible bleeding, torn nail, raw pad | Stop, inspect the paw, rinse minor debris, protect with a bootie or loose wrap, and turn around if pain or limping persists. |
| Heat Stress or Suspected Heatstroke | Heavy panting that does not settle, excessive drooling, weakness, confusion, stumbling, vomiting, diarrhea, collapse or abnormal gums | Stop all activity, move the dog into shade, wet the body with cool—not ice-cold—water, increase airflow and begin urgent transport to a veterinary hospital. |
| Severe Wounds or Uncontrolled Bleeding | Deep puncture, rapidly soaked dressings, animal bite, protruding object, visible tissue damage, pale gums, weakness or collapse | Apply firm, continuous pressure with clean material when this can be done without pressing on an embedded object. Add layers if blood soaks through, leave deeply embedded objects in place, minimize movement and begin urgent evacuation to veterinary care. |
| Systemic Distress | Repeated vomiting, dry heaving, bloating, collapse, confusion, severe lethargy | Stop hiking immediately, keep your dog calm, begin your exit or carry-out plan, and seek urgent veterinary help. |
Cuts, Scrapes, and Bleeding
Tiny surface scrapes can often be cleaned, protected, and monitored. Deep punctures, bite wounds, heavily contaminated wounds, and wounds that continue bleeding are different.
If your dog is cut by a sharp branch, rock, wire, or animal bite, do not assume the wound is minor just because your dog keeps walking. Dogs may continue moving despite significant pain or injury.
Apply gentle pressure to bleeding, cover the wound, reduce movement, and exit the trail. Deep, dirty, or bite-related wounds should be evaluated by a veterinarian.
Bites, Stings, and Allergic Reactions
A wasp sting, spider bite, snakebite, or other trail encounter can trigger swelling, pain, or a rapid allergic reaction.
Watch for sudden swelling of the face, muzzle, lips, or eyes; hives; difficulty breathing; sudden vomiting; weakness; collapse; or extreme distress. These signs require urgent veterinary attention.
For suspected snakebite, severe allergic reaction, collapse, breathing difficulty, bloating, or repeated unproductive retching, do not “wait and see” on the trail. Begin your exit plan immediately and seek emergency veterinary care.
Stomach Upset, Refusing Food, or Vomiting
A single missed trail snack or a mild bout of grass-eating is not automatically a crisis. Some dogs simply become too excited, distracted, or tired to eat normally on the trail.
However, repeated vomiting, dry heaving, visible bloating, bloody diarrhea, worsening lethargy, collapse, or signs of pain are serious warning signs. These symptoms can lead to dehydration or point to dangerous conditions such as bloat, poisoning, heat illness, or internal injury.
If symptoms are repeated, worsening, or paired with weakness or distress, end the hike and seek veterinary advice.
What to Carry in a Dog Hiking First Aid Kit
Your final kit should match your dog’s size, age, health, conditioning, the planned route, the weather, the distance, and how far you will be from help.
Your dog’s supplies are only one part of the emergency plan. You should also carry an appropriate hiking first aid kit for the human members of your group.
A Practical Dog Hiking First Aid Kit may Include:
- Sterile gauze pads and non-stick wound pads
- Self-adhering vet wrap and medical tape
- Saline rinse for flushing wounds or eyes
- Tweezers and a dedicated tick remover
- Blunt-tip scissors and disposable gloves
- A small towel or cooling cloth
- A lightweight emergency blanket
- A spare leash and protective paw bootie
- A collapsible bowl and extra water
- An emergency rescue sling for larger dogs or remote routes
- Your dog’s regular medications
- Veterinary contact information
- Emergency clinic contact information near your hiking area
- Proof of rabies vaccination where required by park rules
- A recent photo of your dog in case you become separated
A Note on Temporary Paw Dressings
A trail dressing is temporary protection intended to keep a minor wound cleaner during evacuation. It is not a permanent bandage or a substitute for veterinary treatment.
Place a clean, non-stick pad over the wound and use only enough self-adhering wrap to keep the dressing in place. Do not stretch the wrap tightly as you apply it because self-adhering material can continue to constrict the limb. Check the exposed toes and the area above the dressing frequently. Swelling, unusual warmth or coldness, discoloration, increasing pain, moisture, odor, or discharge may indicate restricted circulation, irritation, or infection. Loosen or remove the dressing and seek veterinary care if any of these signs appear.
Do not attempt to straighten or repeatedly examine a severely painful or misshapen limb. Unless you have received practical veterinary first aid training or direct instructions from a veterinarian, do not attempt to splint a suspected fracture. Keep the dog still, minimize movement, and begin evacuation. Deep cuts, torn pads, heavy bleeding, puncture wounds, torn nails, exposed bone, and suspected fractures require veterinary evaluation.
VCA’s veterinarian-authored bandage guidance recommends monitoring exposed toes and the area above a bandage for swelling, temperature changes, redness, discharge, odor, or irritation.
A Note on Medications
Never give human pain medications such as ibuprofen, acetaminophen, naproxen, or aspirin to your dog unless your veterinarian has explicitly instructed you to do so.
Many human pain relievers can be dangerous or toxic to dogs at the wrong dose. Some can cause kidney damage, liver damage, stomach ulcers, bleeding disorders, or death.
If your dog has a known medical condition or requires medication on hikes, talk to your veterinarian before your trip. Ask what you should carry, what dose applies to your dog, and which symptoms require emergency care.
If you are looking to round out the rest of your canine safety gear, check out our comprehensive dog hiking gear checklist to make sure you have not missed anything essential.
Emergency Carry-Out Planning
The question is not only, “What if my dog gets hurt?” The harder question is, “What if my dog gets hurt three miles from the trailhead, the light is fading, and I cannot carry them in my arms?”
A small dog and a large dog create completely different rescue problems. If you hike with a large breed, carrying them over technical terrain without a specialized sling can be extremely difficult and dangerous for both of you.
Buy a rescue sling, pack it, and practice using it at home before you need it under stress. Practice when your dog is calm, indoors, and relaxed. The first time you try to lift your dog with a sling should not be during an emergency.
Remote routes require more conservative decisions. If you hike solo, be honest about your physical limits. If you cannot rely on cell service, a satellite communicator may be a smart safety tool.
Ultimately, the best emergency plan is choosing a route you know you can exit safely if things go wrong.
When to Turn Around
Turning around is not failure. It is first aid in decision form.
You should confidently end the hike or turn back if your dog shows any of the following signs:
- Limping that continues or worsens after a solid rest break
- A total refusal to bear weight on a leg
- Deep bleeding, torn pads, torn nails, or visible tissue damage
- Signs of heat stress, confusion, weakness, or collapse
- A stubborn refusal to continue walking forward
- Repeated vomiting, dry heaving, bloating, or severe diarrhea
- Difficulty breathing
- Facial swelling, hives, or signs of an allergic reaction
- Signs of obvious pain when touched or examined
- A sudden change in behavior that feels unusual for your dog
- A route that is becoming more remote while your dog is becoming less comfortable
You do not need to prove the situation is a full emergency before making a safer decision. If you are uncertain, tired, losing daylight, low on water, or far from help, choose the conservative option.
What to Do Before the Next Hike
Every trail incident, no matter how minor, is an opportunity to learn.
Once you are back home and your dog is resting comfortably, take a quiet moment to review the day. Did the route match your dog’s current conditioning? Was the terrain too rough? Was the afternoon hotter than expected? Did the dog’s backpack rub, shift, or create a pressure point? Were their nails too long? Did you notice early signs of discomfort, or did you wait until they refused to continue?
Before the next hike, focus on prevention. Keep your dog’s nails trimmed, build trail conditioning gradually, check paw pads regularly, avoid the hottest parts of the day, choose terrain that matches your dog’s fitness level, and use veterinarian-recommended flea and tick prevention appropriate for your region.
If your dog had a trail injury, heat episode, allergic reaction, repeated vomiting, or unexplained limp, contact your veterinarian before returning to strenuous activity.
To build confidence, consider taking an official pet first aid course or downloading a pet first aid app from a reputable organization. Learning basic vital signs, emergency warning signs, safe handling, and preventive care can help you stay calmer and make better decisions when something goes wrong.
The goal is not to become your dog’s veterinarian. The goal is to become a safer, more prepared hiking partner.
Frequently Asked Questions
What should be in a dog hiking first aid kit?
A dog hiking first aid kit should include sterile gauze pads, non-stick wound pads, medical tape, self-adhering vet wrap, sterile saline rinse, tweezers, a tick remover, blunt-tip scissors, disposable gloves, a small towel, a spare paw bootie, extra water, a collapsible bowl, any regular medications your dog needs, and veterinary and emergency-clinic contact information. For medium-to-large dogs, solo hikes, or remote routes, strongly consider carrying an emergency rescue sling.
What should I do if my dog starts limping on a hike?
Stop immediately, move to a safe area, and secure your dog. Check between the toes, around the paw pads, near the nails, and around the dewclaws for loose gravel, burrs, cuts, swelling, torn nails, or raw areas. Remove only loose surface debris that lifts away easily; do not dig into the paw or pull out anything deeply embedded. If the limp persists after rest, your dog appears painful, swelling develops, or your dog refuses to bear weight, turn around and contact a veterinarian. Do not repeatedly bend or straighten a severely painful or misshapen limb.
Can I bandage my dog’s paw on the trail?
You may place a clean, temporary dressing over a minor paw wound to protect it while returning to the trailhead. Use a non-stick pad and only enough self-adhering wrap to hold the dressing in place. Do not stretch the wrap tightly. Check the exposed toes and the area above the dressing frequently for swelling, unusual warmth or coldness, discoloration, moisture, increasing pain, odor, or discharge. Loosen or remove the dressing if any warning signs appear. Deep cuts, uncontrolled bleeding, torn pads, torn nails, punctures, exposed bone, and suspected fractures require veterinary care. Do not attempt to splint or straighten a painful or misshapen limb unless you have appropriate training or direct veterinary instructions.
What are signs of heatstroke in a hiking dog?
Warning signs include heavy panting that does not settle with rest, excessive or thick drooling, weakness, confusion, stumbling, vomiting, diarrhea, collapse, seizures, or gums that appear unusually dark red, pale, gray, or blue. Heatstroke is a life-threatening emergency. Stop all activity, move the dog into shade, wet the body with cool—not ice-cold—water, increase airflow, and begin urgent transport to a veterinary hospital. Do not wait for the dog to appear fully recovered before seeking veterinary care.
Should I carry a dog rescue sling when hiking?
A rescue sling is worth strongly considering when hiking with a medium-to-large dog, hiking alone, or traveling several miles from road access. If your dog becomes unable to walk, carrying a heavy dog in your arms over uneven terrain can be exhausting and unsafe. Choose a sling suited to your dog’s size and practice using it at home while your dog is calm.
When should I turn around because of my dog?
Turn around if your dog has continued or worsening limping, signs of heat stress, repeated vomiting, dry heaving, abdominal bloating, difficulty breathing, deep or persistent bleeding, extreme lethargy, facial swelling, collapse, refusal to walk, or a sudden behavior change that concerns you. You do not need to prove that the situation is a full emergency before choosing the safer option.
About Kelley Kelly
Kelley Kelly writes at MyPetsRoutine.com, where she shares practical guidance about pet routines, everyday care, health, feeding, and pet ownership. She contributed this article to MoreHiking to help dog owners make safer and better-informed decisions when enjoying the outdoors with their pets.




Leave a Reply