
Most beginner hikers think about shelter as a single item.
You buy a tent, pack the tent, set up the tent, and hope the tent does its job.
That is a reasonable place to start. A good tent is one of the most reassuring pieces of gear you can carry. It gives you a defined sleeping space, protection from rain, a barrier from insects, and a little bit of separation from the weather outside.
But as you spend more time outdoors, you begin to notice something important.
The shelter itself is only part of the answer.
A spring campsite with wet ground asks something different from your shelter than a dry summer night. A warm buggy evening asks something different than a windy fall ridge. A forest site, an open campsite, a muddy low spot, and a dry raised bench all change how your shelter performs.
That is where the idea of a scalable shelter system becomes useful.
A scalable shelter system is not about making hiking more complicated. It is about learning how to adjust your shelter so it matches the trip in front of you. Sometimes that means carrying the full setup. Sometimes it means opening the shelter for more airflow. Sometimes it means using a footprint, adding guylines, choosing stronger stakes, or pitching the fly lower against wind.
The goal is simple.
You want your shelter to fit the season, the weather, the campsite, and your comfort needs.
This article contains affiliate links. If you purchase through these links, MoreHiking may earn a commission at no additional cost to you. We only recommend gear we trust and have carefully researched.
Your Shelter Should Match the Trip
A common beginner mistake is treating a 3-season shelter as if it works the same way in every 3-season condition.
The label can be a little misleading. A 3-season tent is usually designed for spring, summer, and fall use. But those seasons are not the same.
Spring often brings wet ground, cool nights, mud, rain, and condensation.
Summer brings heat, insects, humidity, and the need for airflow.
Fall brings longer nights, colder ground, stronger wind, and sudden weather changes.
So even if you use the same tent across all three seasons, the way you use it should change.
That does not mean you need to buy a different shelter for every month of the year. Most hikers do not need that. What you need is a better understanding of the shelter you already have.
Can the vents stay open in light rain?
Can the rainfly be pitched with more airflow?
Do you know where the extra guyline points are?
Does your footprint help with rough or wet ground?
Are your stakes strong enough for the soil you expect?
Can you keep wet gear out of the sleeping area?
These are simple questions, but they change how well your shelter works.
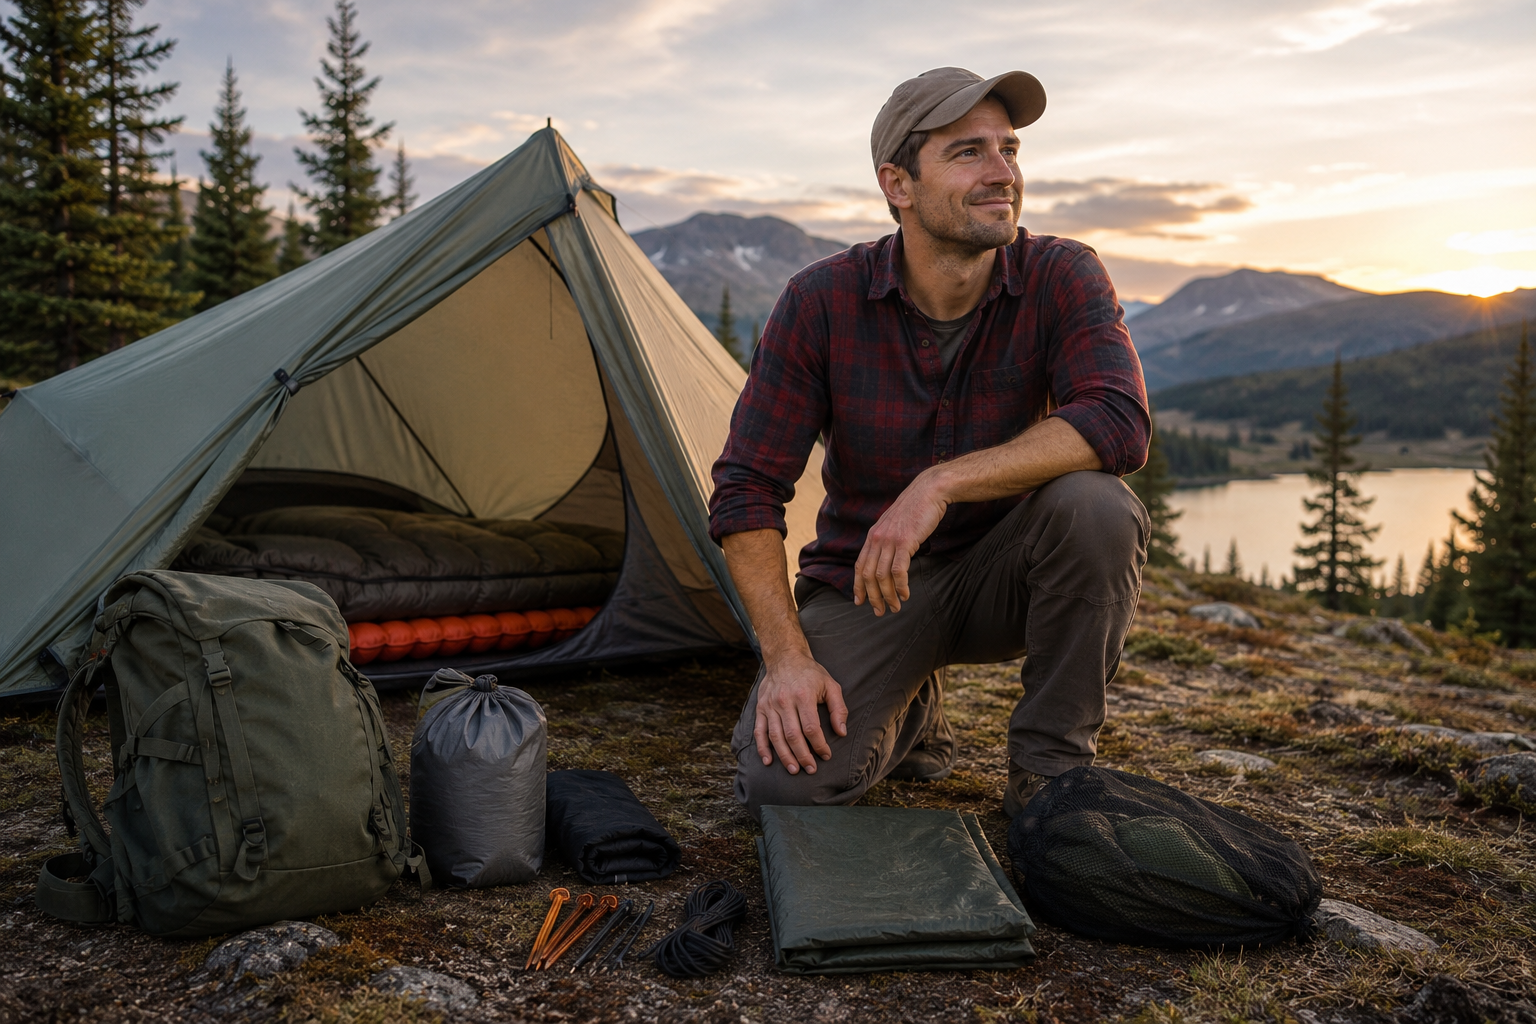
A tent is not just fabric and poles. It is part of a system. The campsite, the groundsheet, the fly, the inner body, the stakes, the guylines, the sleeping pad, and the weather forecast all matter.
Once you see those pieces together, shelter planning becomes less about guessing and more about making good choices.
What Makes a Shelter System “Scalable”?
A shelter system becomes scalable when you can adjust it instead of using it the same way every time.
For some hikers, that may mean a modular tent where the fly, inner body, and footprint can be used in different combinations. For others, it may simply mean learning how to pitch a regular 3-season tent more thoughtfully.
You might carry a footprint in spring when the ground is wet, but leave it home on a dry summer trip.
You might sleep under the mesh inner on a warm, clear night, but use the full fly when rain is possible.
You might pitch the fly higher in summer for airflow, then lower in fall when wind becomes the bigger concern.
You might use every guyline in October, even though you barely needed them on a calm July night.
That is scalability.
It is not only about gear options. It is about judgment.
The best shelter system is not always the lightest setup. It is not always the most enclosed setup either. It is the setup that fits the conditions well enough to keep you dry, rested, and reasonably comfortable.
That is especially important for beginner hikers because discomfort at night can make the whole trip feel harder. If you sleep poorly because the tent is dripping with condensation, the ground feels cold, or the shelter flaps all night in the wind, the next day becomes more difficult.
A scalable system helps reduce those problems before they start.
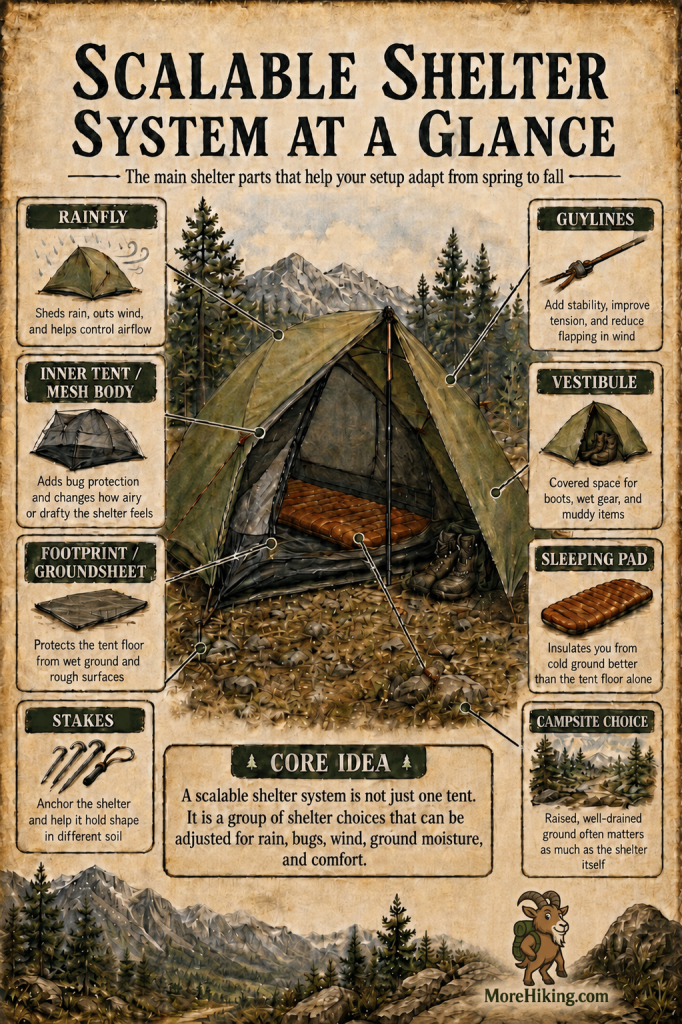
Once you understand these parts, it becomes easier to see why a shelter is not just one item. The rainfly, inner tent, footprint, stakes, guylines, vestibule, sleeping pad, and campsite all work together. The infographic below gives a quick overview of how those pieces fit into a scalable shelter system.
Start With the Conditions, Not the Gear
It is tempting to begin shelter planning by asking, “What tent should I bring?”
A better first question is, “What will this shelter need to handle?”
That small shift changes the way you pack.
If the forecast is mild, the bugs are low, and the ground is dry, you may not need every shelter accessory you own. If the forecast calls for rain, cool nights, and soft ground, your shelter needs to manage moisture from several directions. If you expect wind, then stakes, guylines, and pitch angle become more important.
The season gives you clues, but it should not make the decision for you.
Spring is not always cold and wet. Summer is not always dry and easy. Fall is not always calm and crisp.
The forecast, campsite, terrain, and your own comfort level matter more than the calendar.
Before a trip, think about what is most likely to cause trouble overnight. It may be rain. It may be insects. It may be damp ground. It may be cold air settling into a valley. It may be wind pushing under the fly.
Once you know the main problem, you can build your shelter around it.
The Shelter Parts That Change the System
You do not need to memorize technical gear terms to understand shelter systems. But it does help to know what each part is doing for you.
The rainfly is often the first piece to think about because it takes the weather before the weather reaches your sleeping space. In rain, it sheds water. In wind, it can reduce drafts. In summer, how you use it can decide whether your shelter feels breathable or stuffy.
A rainfly pitched tight and low may feel more secure in wind or heavy rain. That same pitch may feel too warm and closed-in on a humid summer night. A fly pitched with more space near the ground can allow better airflow, but it may also allow more splashback or wind-driven rain in poor weather.
So the fly is not just a cover. It is one of the main ways you tune the shelter.
The inner tent also changes the way the shelter feels. A mesh-heavy inner is excellent when bugs are active and airflow matters. It lets air pass through while still giving you a protected sleeping space. A more solid inner can reduce drafts in cooler weather, which may help the shelter feel more settled in fall.
Neither style is perfect for every condition. Mesh is breathable, but it does little to slow cold air. Solid fabric blocks more draft, but it may feel warmer or less airy in summer.
Then there is the footprint or groundsheet.
This piece is often misunderstood. A footprint does not make a bad campsite good. It does not mean you can pitch in a puddle. What it does is add protection under your shelter floor. That can help on rough ground, damp ground, or sites where the tent floor may see more wear.
In spring, that extra layer can be useful. In dry summer conditions, some hikers may decide it is not worth carrying. The choice depends on the ground you expect and how much protection your tent floor needs.
Stakes and guylines may seem like small details, but they are what turn a shelter from fabric into structure.
A tent or tarp that is poorly staked may sag, flap, or pull loose. A shelter that is properly tensioned is usually quieter, stronger, and better able to handle weather. Guylines also help pull the rainfly away from the inner tent, which can improve airflow and reduce contact between wet fabric and your sleeping area.
Many beginners underuse guylines because the shelter looks “finished” once the corners are staked. But in wind or rain, those extra lines often matter.
The vestibule also plays a bigger role than many beginners expect.
A vestibule is the covered space outside the sleeping area but under the fly. It gives wet boots, a damp pack, rain gear, and muddy items somewhere to go. That may not sound exciting, but on a wet night it can make the difference between a clean sleeping space and a cluttered damp mess.
Finally, your sleeping pad and campsite choice belong in this conversation too.
Your shelter blocks weather. Your sleeping pad insulates you from the ground. Your campsite decides how much water, wind, cold air, and condensation your shelter has to manage.
A good shelter in a poor campsite can still feel uncomfortable. A simple shelter in a smart campsite can perform better than expected.
Spring: Build Around Wet Ground and Condensation
Spring can fool you.
The afternoon may feel warm enough to hike in a light layer, but the campsite can feel like a different season once you stop moving. The ground may still be cold, soft, and damp from rain, thaw, or snowmelt. A site that looks flat and harmless in daylight may hold more moisture than you realize.
That is why spring shelter planning should start below your feet.
Most people think about the rainfly when they think about staying dry. The fly matters, of course. But in spring, the ground can be just as important as the sky.
If you pitch in a low spot, water may move toward you during the night. If the soil is already soft and saturated, the pressure of your body and gear can push the tent floor into wet ground for hours. If rain arrives after dark, a small drainage path can become a problem you did not notice when you set up.
A better spring habit is to pause before unpacking.
Look for ground that sits slightly higher than the area around it. Avoid muddy basins, low flats, dry streambeds, and places where water would naturally flow. Notice whether leaves, needles, or small debris have gathered in lines. That can be a clue that water moves through the area during rain.
Good campsite choice does not have to be complicated. You are simply asking, “If rain comes tonight, where will the water go?”
Once the site looks reasonable, then ground protection becomes useful.
A footprint, groundsheet, or durable tent floor can help protect the bottom of your shelter from wet or rough ground. A bathtub-style floor can also help. This means the tent floor curves up the sides of the tent a few inches, which reduces the chance of splashback reaching the sleeping area.
But none of this replaces site selection.
A bathtub floor is not permission to camp in standing water. A groundsheet is not a fix for a drainage path. These tools help most when you have already chosen the best site available.
Spring also brings another problem that surprises many beginners: condensation.
When rain starts or the air turns cool, it feels natural to close everything. You zip the doors, close the vents, and try to seal the shelter tight. At first, that may feel warmer.
But it can also trap moisture.
Your breath adds moisture to the air. Damp clothing adds moisture. Wet boots and packs add moisture. If that damp air cannot escape, it can collect on the inside of the rainfly. Later, it may drip, run down the fabric, or brush onto your sleeping bag.
That does not always mean the tent is leaking. Sometimes the moisture is coming from inside the shelter.
This is why ventilation matters even when the weather is damp.
Use roof vents if your shelter has them. Crack the vestibule when conditions allow. Keep a small gap for airflow if it can be done without letting rain blow in. The goal is not to make the shelter cold. The goal is to let damp air escape before it becomes a problem.
Spring shelter comfort is a balance. You need rain protection, ground protection, and airflow working together.

What every hiker/backpacker should carry, but 90% forget.
Summer: Build Around Airflow and Bugs
Summer shelter problems are usually different.
The ground may be drier. The nights may be warmer. You may not need the same level of protection that felt important in spring.
But summer has its own way of making a shelter uncomfortable.
A tent that feels cozy in April can feel hot and still in July. Humid air can linger inside. Mosquitoes or blackflies can make an open setup difficult. A rainfly that is pitched too low may trap heat when you want airflow most.
In summer, scaling your shelter often means removing what you do not need while keeping the protection that still matters.
For many hikers, the mesh inner becomes the most useful part of the shelter. It gives you airflow while keeping insects away from your sleeping space. That matters because summer comfort is not just about temperature. It is also about whether you can actually sleep without bugs bothering you.
On a warm, clear night, you may be able to sleep with the mesh inner only and leave the rainfly off. This can make the shelter feel open and comfortable. It also gives you a better view of the sky and more moving air.
But this choice should come from the conditions, not wishful thinking.
If rain is possible, keep the fly nearby and know how quickly you can attach it. If heavy dew is likely, remember that exposed gear may still be damp in the morning. If you are camping in a place where weather changes quickly, the full setup may still be the better choice.
Some shelters allow a fly-and-footprint setup. This means using the rainfly and footprint without the inner tent. It can save weight and create a more open sleeping area.
That can be useful, but it is not always beginner-friendly.
Without the inner tent, you lose bug protection. You may also be more exposed to splashback, drafts, and crawling insects. A fly-only setup works best when bugs are low, the forecast is stable, and you have already practiced the pitch.
It is not a shortcut to use without thought.
Campsite choice also changes in summer.
In spring, you may focus first on drainage. In summer, airflow often becomes more important. Low, damp areas can hold humidity and attract insects. Campsites near still water may be buggy. Thick vegetation can block wind and trap warm air around the shelter.
A site with gentle airflow can make a big difference.
That does not mean choosing an exposed site if storms are possible. It means looking for a balance. You want enough protection to be safe, but enough air movement to keep the shelter from feeling damp and stale.
Shade can also matter. A tent pitched in full morning sun can heat up quickly. If the weather is warm, a little morning shade may make the difference between a comfortable start and waking up in a hot shelter.
Summer scaling is not only about cutting weight.
It is about creating a cooler, more breathable shelter while still protecting yourself from bugs, dew, and surprise weather.
Fall: Build Around Wind, Cold Ground, and Stability
Fall may be the season when a scalable shelter system proves its value most clearly.
The days can be beautiful. The bugs may be mostly gone. The air can feel crisp and comfortable while you are hiking.
Then evening arrives.
The temperature drops. The wind picks up. The ground feels colder than expected. A shelter pitch that would have felt fine in August may suddenly feel loose, drafty, or noisy.
Fall is when you begin to scale the system back up.
A lower, tighter pitch often makes more sense when wind is expected. In summer, you may lift the fly slightly to improve airflow. In fall, you may want the fly closer to the ground to reduce wind moving underneath it.
This does not mean sealing the shelter completely. You still need ventilation. But the balance changes. Instead of chasing maximum airflow, you are trying to reduce drafts while still allowing moisture to escape.
Guylines matter more in this season too.
If your shelter has extra guyout points, fall is a good time to use them. Do not wait until the wind is already pushing the shelter around. It is much easier to tension guylines before dark, before rain begins, and before the weather gets worse.
A well-guyed shelter usually feels quieter and more stable. It also helps the rainfly keep its shape, which can reduce flapping and prevent wet fabric from pressing against the inner tent.
Stakes deserve more attention in fall as well.
The ground may be dry and hard, loose and rocky, or cold enough that light stakes are harder to place. Thin stakes that worked well in soft summer soil may not hold as well when the weather turns rough.
You do not need to carry heavy stakes on every trip. But if wind is likely or the ground may be difficult, stronger Y-stakes or V-stakes can be a smart part of the system.
A shelter is only as secure as the way it is anchored.
Fall also reminds hikers that a tent is not the main source of warmth.
A tent can block wind and rain. It can reduce drafts. It can make your sleeping space feel more protected.
But your sleeping pad is what insulates you from the ground. Your sleeping bag or travel quilt holds warmth around your body. Your clothing, campsite choice, and moisture management also matter.
If you are cold at night, the tent may not be the problem. The issue may be cold ground, an underpowered sleeping pad, a damp sleep system, or a campsite that is too exposed.
This is why shelter planning and sleep-system planning should work together.
A Simple Seasonal Shelter System Guide
By this point, the pattern should be easier to see. The shelter itself may stay the same from spring to fall, but the way you use it should change with moisture, airflow, wind, and ground temperature. The infographic below gives a quick seasonal comparison to help pull those differences together.
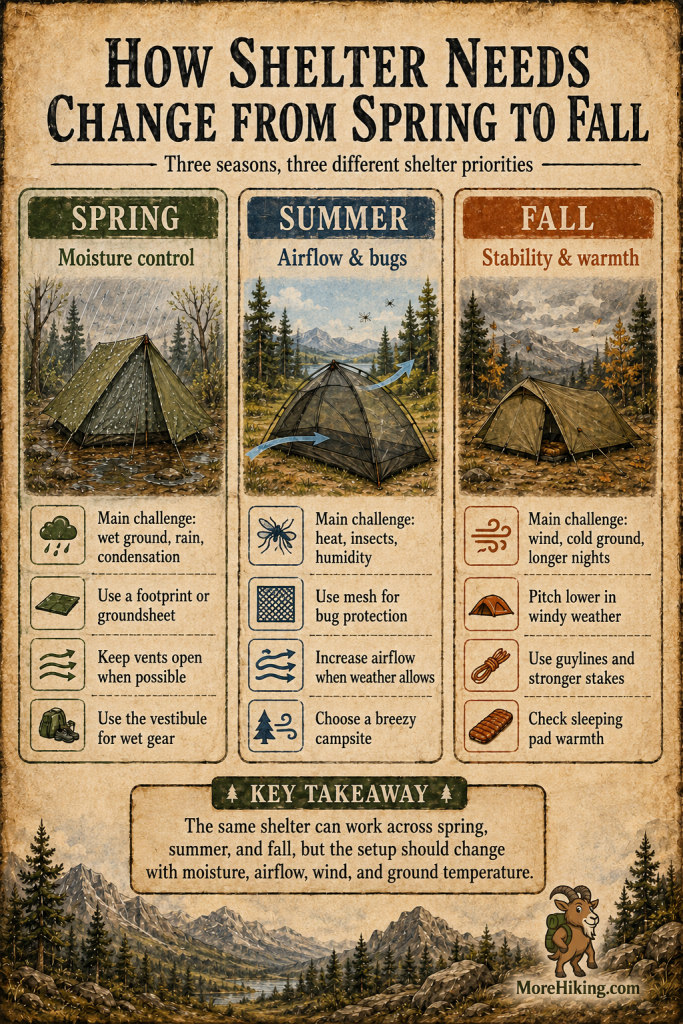
The table below turns the same idea into a quick planning guide you can scan before a trip.
| Season | What Usually Causes Trouble | How to Adjust the Shelter System | Beginner Reminder |
|---|---|---|---|
| Spring | Wet ground, rain, mud, and condensation | Choose raised ground, use ground protection, manage vents, use the vestibule for wet gear | Staying dry means managing moisture from below, above, and inside the shelter |
| Summer | Heat, insects, humidity, and still air | Use mesh, increase airflow, choose breezy campsites, only go lighter when conditions allow | Bug protection may matter as much as rain protection |
| Fall | Wind, colder ground, longer nights, and sudden weather changes | Pitch lower, use guylines, choose stronger stakes, check your sleeping pad warmth | A secure pitch and warm sleep system matter more than simply carrying a heavier tent |
The point is not to follow the table blindly.
The point is to notice what the season is asking from your shelter.
Spring asks, “Where will the water go?”
Summer asks, “How will air move through this shelter?”
Fall asks, “Will this pitch stay secure if the wind comes up?”
Those questions are more useful than simply asking whether your tent is rated for 3-season use.
The Beginner Mistakes That Make Shelters Feel Worse Than They Are
Many shelter problems come from small decisions made before bedtime.
One of the most common is using the same setup every trip. Once a beginner learns how to pitch a tent, it is natural to repeat that setup without thinking much about it. That feels safe and familiar.
But the same setup may not work equally well in every season.
A low, tight pitch may help in fall wind but feel stuffy in summer. A high, airy pitch may feel wonderful on a warm night but allow too much wind-driven rain in a storm. A footprint may be useful in spring mud but unnecessary on a dry, durable tent site.
The goal is not to change everything every time. The goal is to notice what the trip needs.
Another common mistake is closing every vent when the weather turns wet.
This is understandable. Rain makes people want to seal the shelter. But if moisture cannot escape, condensation can build inside. Then the shelter may feel wet even if the rainfly is doing its job.
Dry shelter use is not only about blocking rain. It is also about letting damp air out.
Guylines are another overlooked piece. Many hikers leave them packed away unless the weather becomes serious. But guylines are not only for emergencies. They help the shelter hold its shape, reduce flapping, and keep the fly away from the inner tent.
Using them early is easier than fixing a noisy shelter later.
Beginners also sometimes expect the tent to provide warmth that really belongs to the sleep system. If the ground is cold and your sleeping pad is not warm enough, you may feel chilled even in a good tent. If your quilt or sleeping bag is not suited for the overnight low, a better pitch may help, but it will not solve the whole problem.
This is why experienced hikers think about shelter, sleep insulation, clothing, and campsite as one connected system.
Finally, many hikers do not practice enough before the trip.
It is one thing to pitch a tent once in calm weather. It is another thing to understand how the vents work, where the guylines attach, how the fly changes in different pitches, and how quickly you can set things up if rain arrives.
You do not need to turn practice into a major project.
Set the shelter up at home or in a local park. Try the normal pitch. Then adjust the fly. Add the guylines. Open and close the vents. If your shelter allows a footprint-and-fly pitch, test it before relying on it.
Practice gives you options.
Options give you confidence.
A Simple Way to Plan Your Shelter Before Each Trip
Before you pack, take a few minutes to picture the night ahead.
Not the whole trip. Just the night.
Where are you likely to camp? What will the ground be like? Is the area exposed or sheltered? Are bugs likely? Will the air be humid? Is rain possible? Could the wind rise after dark? How cold will the ground feel by morning?
Those questions help you decide what your shelter needs to do.
If the ground may be wet, ground protection and campsite choice move higher on the list.
If insects are active, the mesh inner may matter more than saving weight.
If the night will be windy, guylines and stronger stakes become more important.
If the temperature is dropping, think about your sleeping pad and sleep system, not just the tent.
This is the heart of scalable shelter planning. You are not packing out of habit. You are packing with a purpose.
You may still bring the same tent most of the time. That is fine. The difference is that you understand how to use it better.
A Scalable Shelter Does Not Have to Be Complicated
It is easy to hear the phrase “scalable shelter system” and imagine expensive gear or complicated setups.
That is not necessary.
For many beginner hikers, a scalable system begins with a regular 3-season tent and a little more awareness. Learn what the rainfly does. Learn how the vents work. Learn when a footprint helps. Learn how to use guylines. Learn how different campsites change the shelter’s performance.
That is enough to start.
As your experience grows, you may explore tarp shelters, trekking-pole shelters, interchangeable inners, or fly-first pitching systems. Those can be useful tools, especially for hikers who want lighter or more flexible setups.
But they are not required at the beginning.
Start with the shelter you have. Learn how it behaves in spring rain, summer humidity, and fall wind. Notice what works. Notice what feels uncomfortable. Adjust from there.
That is how skill grows.
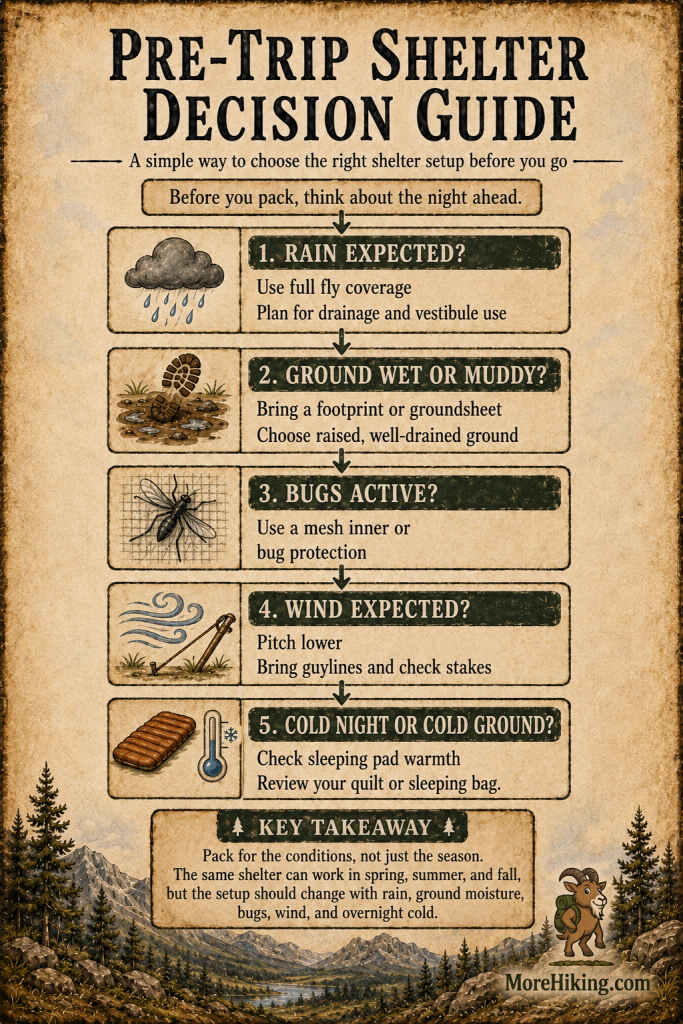
Before you pack for any trip, it helps to pause and think through the conditions you are likely to face overnight. Rain, wet ground, insects, wind, and cold ground can all change what your shelter needs to do. The infographic below turns those questions into a simple pre-trip guide so you can make better shelter decisions before you leave home.
Final Thoughts
A good spring, summer, and fall shelter system is not about carrying the most gear.
It is about carrying the right pieces for the conditions and knowing how to use them well.
In spring, that usually means paying close attention to wet ground, rain, and condensation.
In summer, it means giving yourself airflow and bug protection without carrying things you do not need.
In fall, it means thinking more carefully about wind, cold ground, stronger staking, and a secure pitch.
The shelter itself matters. But the way you use it matters just as much.
When you understand your shelter as a system, you stop guessing. You start seeing how the rainfly, inner tent, footprint, stakes, guylines, sleeping pad, and campsite all work together.
That is when shelter becomes less intimidating.
It becomes a skill.
You are not just packing a tent. You are building a small, adjustable home for the night — one that can change with the season, the weather, and the trail ahead.
Frequently Asked Questions
What is a scalable shelter system for hiking?
A scalable shelter system is a shelter setup that can be adjusted for different seasons and weather conditions. Instead of using your tent the exact same way on every trip, you adjust parts like the rainfly, footprint, mesh inner, stakes, guylines, and ventilation based on the conditions you expect.
For spring, that may mean more ground protection and better moisture control. For summer, it may mean more airflow and bug protection. For fall, it may mean a lower pitch, stronger stakes, and better wind control.
Do beginner hikers need a modular tent to build a scalable shelter system?
No. A beginner does not need an expensive modular tent to start building a scalable shelter system. Many standard 3-season tents can be used more effectively once you understand how the rainfly, vents, footprint, vestibule, stakes, and guylines work together.
The most important step is learning how to adjust your existing shelter for rain, heat, bugs, wind, and wet ground before buying more gear.
Should I always use a tent footprint when hiking?
Not always. A tent footprint is most useful when the ground is wet, rough, muddy, or likely to wear down the bottom of your tent. In spring, a footprint or groundsheet can be especially helpful because campsites may be damp from rain, thawing ground, or snowmelt.
In dry summer conditions, some hikers leave the footprint at home to save weight. The key is to match the footprint to the ground conditions, not use it automatically every time.
How do I reduce condensation inside my tent?
To reduce condensation, keep some airflow moving through your shelter whenever conditions allow. Use roof vents, crack the vestibule slightly, avoid pitching in low damp areas, and do not seal the shelter completely unless the weather truly requires it.
Condensation happens when warm, moist air from your breath and body meets cooler shelter fabric. Good ventilation and smart campsite selection can help reduce moisture buildup inside the tent.
How should I adjust my shelter setup for fall hiking?
For fall hiking, focus on wind control, colder ground, and a more secure pitch. Use your guylines, choose stronger stakes when the ground is firm or exposed, and consider pitching the rainfly lower if wind is expected.
Fall nights can be colder than expected, so remember that your tent is only one part of the system. Your sleeping pad, sleeping bag or quilt, clothing, and campsite choice all matter for staying comfortable overnight.
If you have enjoyed this article, please also read our other post.


Leave a Reply